
Murf AI Canva integration is a two-tool workflow that enables designers to add studio-quality voiceovers to any Canva presentation or video. You write a script in Murf Studio, generate audio from 200+ AI voices across 35 languages, export the file, and upload it directly to your Canva design - combining professional narration with Canva’s visual output.
Canva makes it easy to design professional presentations, social videos, and ads - but it has no built-in tool for creating voiceover audio that sounds like it belongs in a broadcast production. Recording your own voice introduces inconsistency, background noise, and the need for retakes. Murf AI fills that gap directly. You write a script, generate studio-quality audio in minutes, export the file, and drop it into your Canva project. The result is a designed presentation with a polished narration that matches the visual quality you already invest in.
This guide walks through the complete murf ai canva integration workflow. Every step is covered in sequence - from writing your voiceover script in Murf AI’s text-to-speech engine, through exporting the audio, to placing it in Canva and syncing it with your slides or video. If you have accounts on both platforms, you can produce your first voiced Canva presentation within 15 minutes of starting this guide.
What the Murf AI Canva Integration Does
Murf AI Canva Integration covers the strategies and tools that deliver real productivity gains in this space. Canva makes it easy to design professional presentations, social videos. This guide walks through the practical steps from setup through advanced optimization.
The murf ai canva integration is not a native button inside Canva - it is a two-tool workflow where Murf handles audio creation and Canva handles visual presentation. You generate the voiceover in Murf Studio, export it as a standard audio file, and then upload that file to your Canva design using Canva’s audio track feature. Canva’s Pro and Teams plans support audio on presentations and videos; free Canva accounts can add audio to video designs.
This approach gives you the best of both platforms. Murf’s voice library offers 200+ AI voices across 35 languages, with controls for speed, pauses, emphasis, and pronunciation that Canva could never replicate in a native tool. Canva’s design environment handles layouts, transitions, animation, and brand consistency at a level no audio tool can match. The integration connects them cleanly through a standard audio file.
What you can produce with this workflow:
- Narrated presentations for client pitches, investor decks, and internal briefings (compare against Google Slides voiceover via Murf and the best AI presentation tools)
- Social video content with professional voiceover for LinkedIn, Instagram, and YouTube Shorts
- Product demo videos built in Canva with scripted narration
- Training materials and onboarding content where both visuals and narration matter (the Murf eLearning narration guide covers SCORM and LMS export specifics)
- Marketing ads where a polished voice sells the concept alongside the design
What You Will Need
Before starting, confirm you have both accounts set up and accessible.
Murf AI account - Set up your Murf AI login before starting this guide. The free tier includes 10 minutes of voice generation and 2 projects, which is enough to complete this guide. For ongoing production, the Creator plan ($29/month, or $19/month annual with annual billing) gives you 2 hours of generation per month and commercial usage rights. The Business plan ($99/month, or $66/month annual annually) includes direct Canva integration features that simplify the workflow further. Compare plan options on the Murf pricing page.
Canva account - The free Canva tier supports audio on video designs. Canva Pro and Teams plans extend audio support to presentations and add timeline controls for syncing narration with slide transitions.
Your script or outline - You do not need a finished script before you start, but having your talking points or slide notes ready speeds up the scripting step. For a 15-slide presentation with one to two sentences per slide, expect 300 to 500 words total. The Murf script writing tips guide covers tightening copy for narration if your draft runs long.
Your Canva design - Have your presentation, video, or ad design either complete or at a near-final stage before generating your audio. If you are still choosing a design tool, see our best AI content creation tools roundup for alternatives to Canva. Finalizing the design first means you can write narration that matches the actual content on each slide rather than revising audio after visual changes.
Prerequisites
- A modern web browser (Chrome recommended for both Murf and Canva)
- Your Canva design open and ready for audio
- A script or slide notes prepared for voiceover - even a rough draft works for your first run through the workflow
- Headphones for previewing audio accurately during fine-tuning
No microphone, recording setup, or audio editing experience is required.
Step 1: Create Your Voiceover Script in Murf Studio
Log into your Murf AI account and navigate to the Studio editor. This is where you will create the voiceover project that feeds into your Canva design.
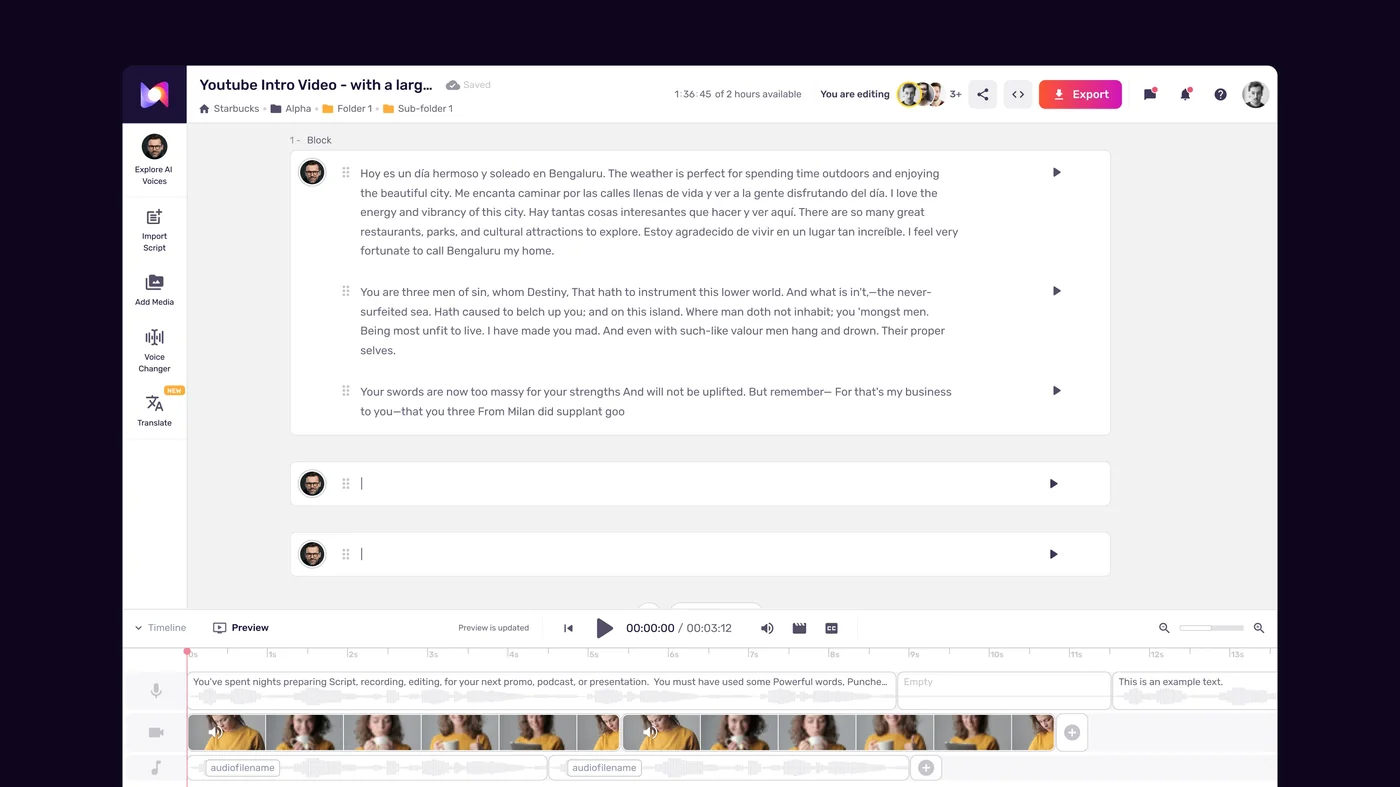
Create a new project:
- Click “Create New Project” from the Murf dashboard
- Select “Voiceover” as the project type
- Name the project to match your Canva design - something like “Canva - Q2 Client Deck - Narration” keeps your Murf library organized when you are managing multiple design projects
- Choose your primary language from the dropdown
Write and paste your script:
Murf processes text in blocks, one block per paragraph. For presentation voiceovers, the most effective structure is one block per slide or one block per key point. For detailed guidance on block structure and pronunciation controls, that dedicated guide covers advanced fine-tuning. This gives you fine-tuning control over each section independently - if Slide 4 needs a slower delivery, you adjust that block without touching the rest.
A few formatting rules that improve AI delivery quality:
- Write short sentences. Aim for 12 to 18 words per sentence. Long, clause-heavy sentences lose natural phrasing mid-delivery.
- Avoid abbreviations. Write “for example” not “e.g.”, “three minutes” not “3 min”. Abbreviations are inconsistently handled by text-to-speech engines.
- Use active voice. “This feature saves you two hours a week” delivers better than “Two hours per week are saved by this feature.”
- Write one idea per block. If a slide covers two distinct points, write them as separate blocks in Murf. The AI will generate natural spacing between blocks.
Once your script is written or pasted, Murf divides it into blocks automatically based on paragraph breaks. Review the block divisions and manually split any block containing more than two to three sentences.
Step 2: Generate and Fine-Tune Your Audio
With your script entered, select a voice from Murf’s library.
Choose a voice for your Canva content type:
(See our voice selection tips and the broader Murf AI voiceover guide for a fuller framework.)
- Open the voice browser from the right panel in Studio
- Filter by language and then by use case - “Presentation” and “Professional” categories surface voices suited for slide deck narration
- For social video content, explore “Conversational” and “Energetic” tags
- Preview each candidate voice by clicking the play button next to its name - always audition voices with a sentence from your actual script, not just the generic sample
Generate and review your initial output:
- Click “Apply to Project” on your selected voice to apply it across all blocks
- Click “Generate All” to produce audio for the entire script simultaneously
- Listen through the complete output before making any adjustments - identify systemic issues first (pace consistently too slow, voice too formal) before fixing individual blocks
Fine-tuning for presentation narration:
Presentation voiceover moves faster than podcast or course audio because slides provide visual context that carries part of the cognitive load. A baseline speed of 1.0x to 1.1x works well for most presentation content.
- Pauses between slides - Insert a 700ms to 900ms pause at the end of each slide’s narration block. This creates a natural break that matches the slide transition rhythm.
- Pauses for emphasis - For key data points, insights, or calls to action, insert a 400ms pause immediately before the critical phrase. The brief silence draws attention before the important line arrives.
- Emphasis on key terms - Select specific words that anchor a slide’s argument and apply the emphasis control. Use one to two emphasis markers per block maximum.
- Pronunciation corrections - If any product names, company names, or technical terms are mispronounced, use the pronunciation editor to specify the correct phonetic form. These corrections save per block and apply across the project.
For social videos and ads, pacing can run faster - 1.1x to 1.2x - to match the higher energy of short-form content. For explainer videos and training materials, stay at 1.0x or slightly below to give viewers time to absorb the information. If you are creating audio intros or outros for podcast-style segments, the Murf podcast intro and outro guide covers the rhythm specifics.
Step 3: Export Your Audio from Murf
When you are satisfied with the complete voiceover, export the audio file in a format ready for Canva.
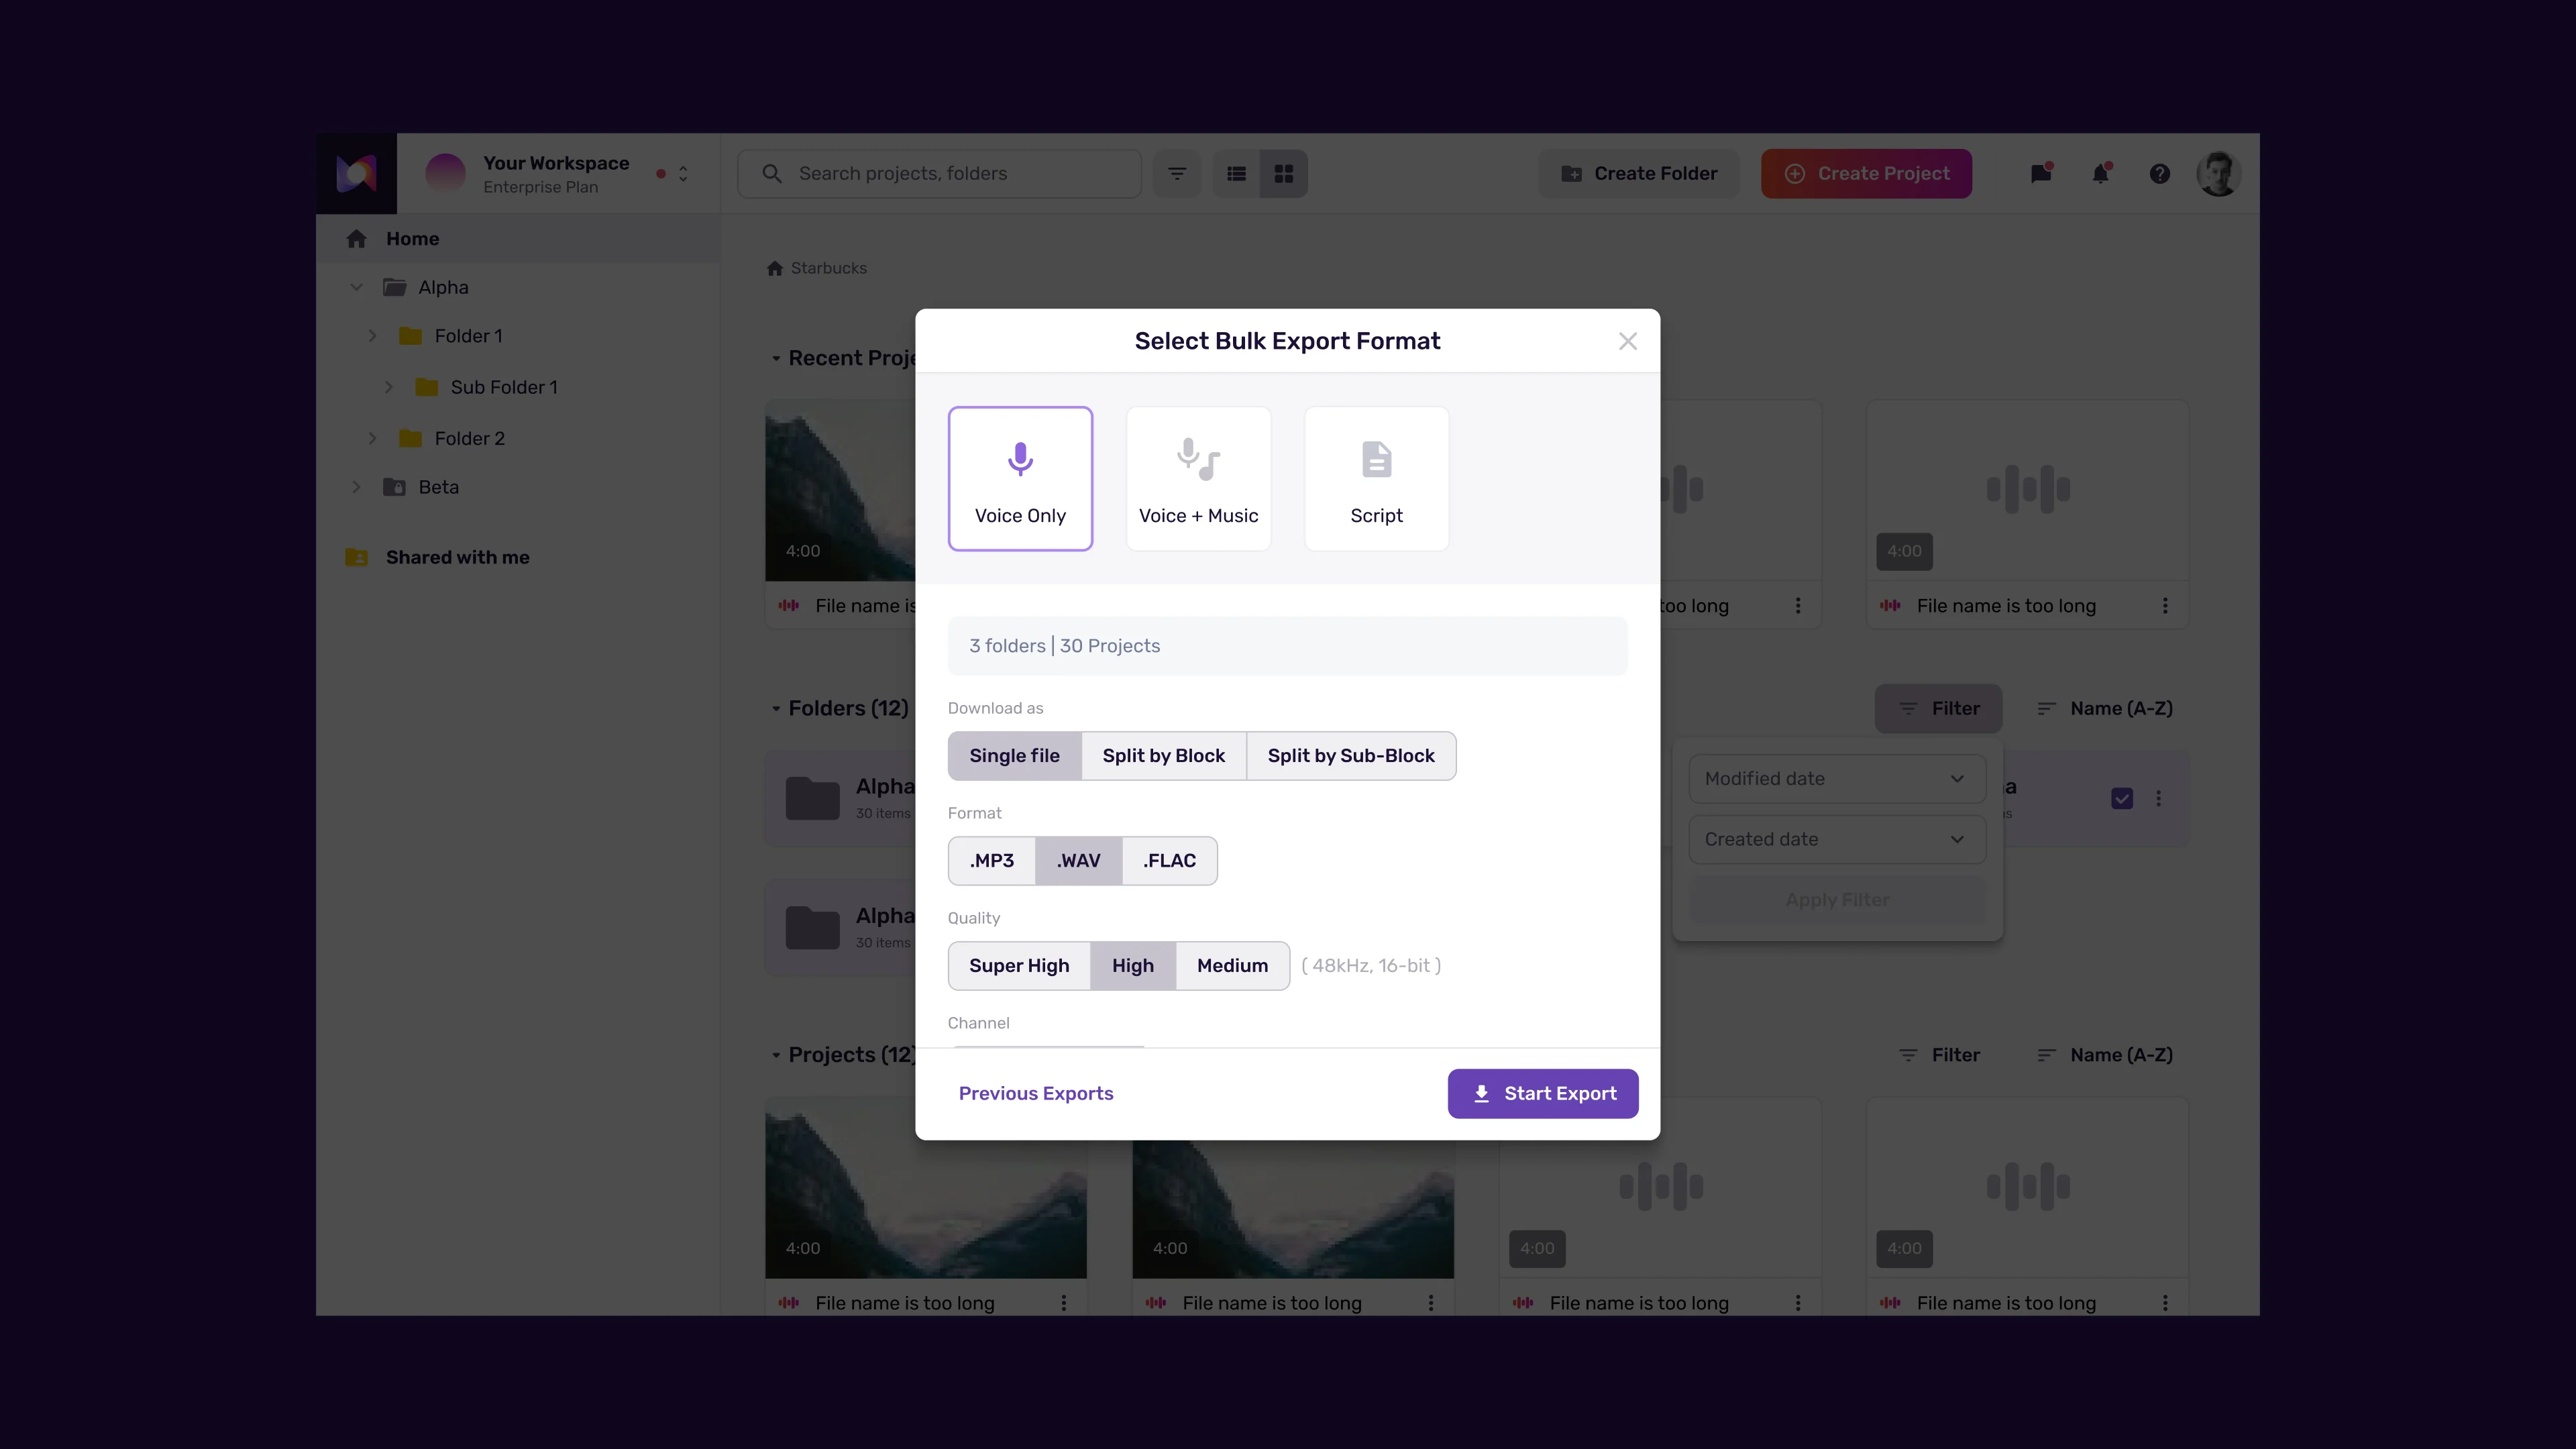
Export settings for Canva:
- Click the Export button in the top right of Studio
- Select “Audio Only” as the export type
- Choose MP3 format - Canva accepts MP3 natively and the file sizes are compact, which matters for Canva’s upload limits (see our export formats and quality guide for the full breakdown). If you plan to do additional audio post-processing before uploading to Canva, WAV gives you higher quality for that processing step
- Set the sample rate to 44100 Hz - this is standard for web and presentation audio and matches Canva’s internal audio processing
- Confirm “Export All Blocks” is selected so the download includes all narration as a single continuous file
Organize your exported file:
- Download the file to a folder you can locate quickly - you will be switching to Canva immediately after
- Name the file clearly:
[ProjectName]-voiceover-v1.mp3establishes a versioning habit that becomes useful when you revise the design and need to update the audio - If your design has multiple distinct sections - for example, a long-form video with a distinct intro, body, and outro - consider exporting each section as a separate file. Canva allows multiple audio tracks on video designs, which gives you more precise timing control per section
Step 4: Add the Voiceover to Your Canva Design
Open your Canva design and navigate to the slide, video, or page where you want to add the voiceover audio.
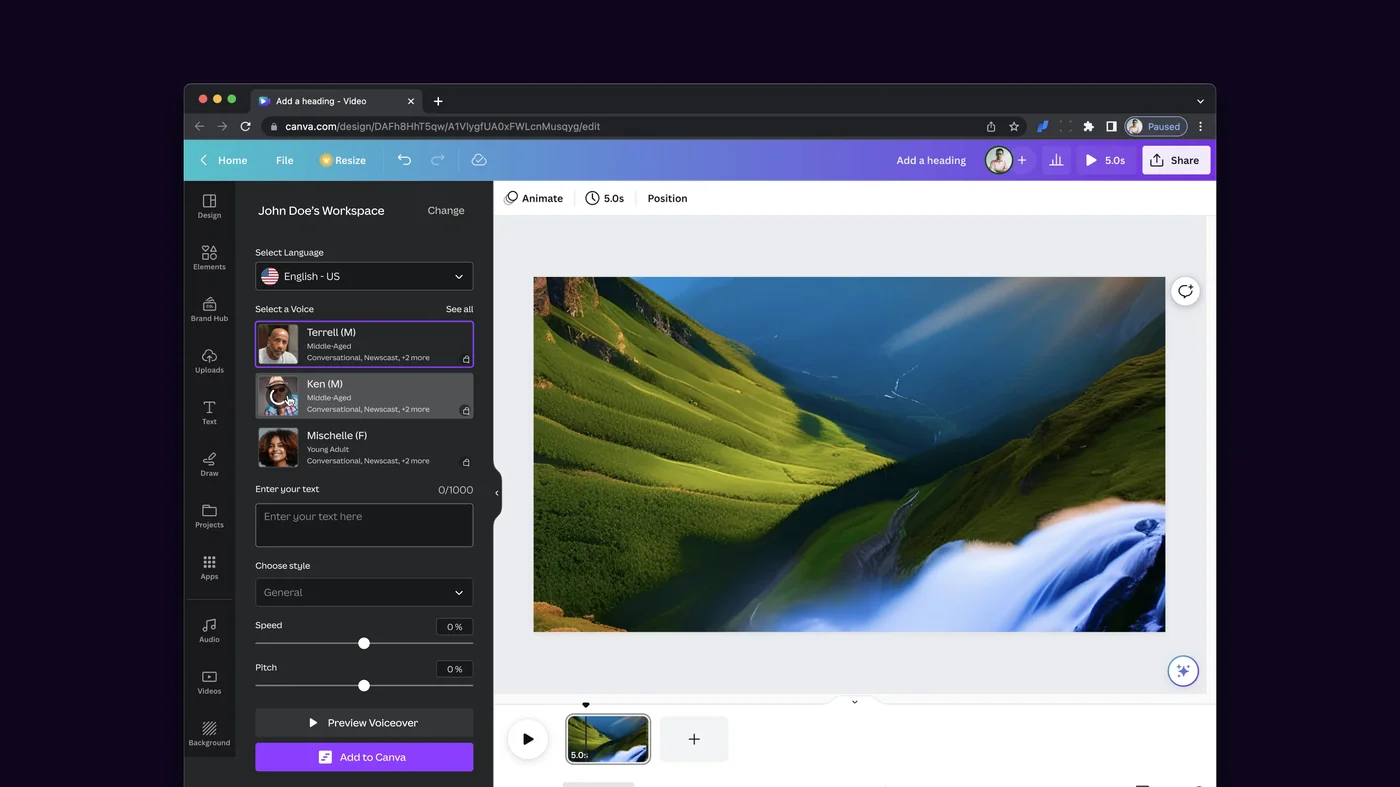
For Canva video designs (social videos, ads, demo videos):
(See Canva’s help center on adding audio for the latest UI specifics.)
- With your video design open in Canva, click the “Audio” icon in the left toolbar
- Click “Upload audio” at the top of the audio panel
- Select the MP3 file you exported from Murf
- Once uploaded, the file appears in your audio library - drag it onto the video timeline or click “Add to page”
- The audio track appears as a bar below the video timeline. You can drag it left or right to adjust where the narration starts
For Canva presentations (Canva Pro or Teams):
- Open your presentation in Canva
- Click the slide where you want the narration to begin playing
- Navigate to the top toolbar and click “Present” - then select “Add audio” or use the audio icon in the left panel, depending on your Canva version
- Upload the Murf audio file from your local drive
- Canva attaches the audio to the presentation - it plays automatically when the presentation begins from that slide
Canva free tier note: Free Canva accounts can add audio to video designs but not to standard multi-page presentations. If you are working with a presentation format on a free account, consider converting your design to a video format in Canva first, which unlocks the audio track feature.
Step 5: Sync Audio Timing with Your Visuals
After adding the audio, play through the design to check how the narration aligns with your visuals.
For video designs:
- Use the timeline scrubber to identify any sections where the narration runs ahead of or behind the corresponding visual
- To extend a visual segment to match longer narration, select that element or clip in the timeline and drag its end point to the right
- To shorten a segment where narration ends before the visual does, trim the visual clip or add a brief pause in the Canva timeline
- For animated elements - text reveals, image fades, icon animations - check that each animation trigger lands at a logical point in the narration. Adjust animation timing in the element’s settings panel
For presentations:
(See the pacing tips guide for more on adjusting voice speed for slide content.)
- Switch to Presenter view or run a full preview of the presentation
- Note any slides where the narration feels rushed relative to how long a viewer needs to read and absorb the slide content
- Return to Murf Studio, select the relevant block, and add a 500ms to 1,000ms pause at the end of that block’s narration
- Re-export the audio, re-upload to Canva, and replace the existing audio file
Handling timing mismatches between narration length and slide duration:
A common scenario is a slide with minimal visual content but substantial narration - the voice is still talking when a viewer would naturally click to the next slide. Address this in two ways. First, extend any dwell time or auto-advance timing in Canva’s slide settings to match the audio length. Second, consider whether the narration for that slide is actually longer than the visual warrants - if so, trim the script in Murf and regenerate.
For slide decks where you control the advance timing manually (live or self-paced presentation mode), this is less of a concern - the presenter or viewer advances slides when ready.
Integration Recipes
Here are three practical ways to apply the Murf AI Canva integration for specific content types.
Recipe 1: Narrated investor or client pitch deck
Create your pitch deck in Canva as you normally would (also see best AI tools for content creators if you want to compare design platforms). Once the deck is finalized, write one to two sentences of narration per slide that surface the insight, not just the visible content. The narration should add context the slide alone cannot convey - the story behind the number, the significance of the comparison, the next step you are asking for. Generate the audio in Murf using a professional voice at 1.0x speed, export as MP3, and upload to Canva as a video design. Share the video link rather than a static PDF. Recipients who watch the narrated version retain significantly more of your pitch argument than those who read the slides cold.
Recipe 2: LinkedIn or Instagram video with voiceover
Design a 30 to 60 second video in Canva using animated slides, product shots, or branded graphics (the marketing voiceover workflow guide covers script frameworks for these formats). For voice selection guidance tailored to short-form content, see the Murf voice selection tips guide. Write a tight script - 80 to 120 words - that runs through your key message in a conversational tone. Choose a voice in Murf tagged “Conversational” or “Energetic” and set the speed to 1.1x to match the pacing energy of social content. Export as MP3, add to your Canva video timeline, and align the audio start with your first key visual. Add captions in Canva using the caption feature - most social video is watched without sound, and captions ensure your message lands for silent viewers too.
Recipe 3: Product demo or feature walkthrough video
Record or assemble your screen recording clips, product screenshots, or feature animation assets in Canva (the Murf YouTube voiceover workflow is a useful adjacent reference). Write narration that describes what is happening on screen and why it matters - not just “here is the feature” but “here is what this saves you.” Generate the audio in Murf using a clear, measured voice at 1.0x speed with 700ms pauses between each feature section. Export as MP3 and add to your Canva video timeline. Align each narration section with the corresponding visual using the timeline scrubber. Export the final video from Canva in MP4 format for upload to YouTube, your website, or your sales team’s toolkit.
Frequently Asked Questions
Does Murf AI have a native Canva integration or plugin?
Murf AI offers a direct Canva integration as part of its Business plan ($99/month, or $66/month annual annually). This integration connects the two platforms so you can access Murf’s voice generation from within Canva without switching between browser tabs. On lower plan tiers, the workflow described in this guide - generate in Murf, export as MP3, upload to Canva - achieves the same result in a few extra steps. Check the Murf features page for the current status of the Canva integration and plan availability.
What audio formats does Canva accept?
Canva accepts MP3 and M4A audio files for upload. MP3 is the recommended format for the Murf to Canva workflow because it is universally supported, compact in file size, and high quality at standard bitrates. Canva’s upload limit for audio is typically 250MB per file, which is far more than any standard presentation or video narration will require. If you encounter upload errors, verify the file is in MP3 format and under the size limit.
Can I add different narration to different slides?
Yes. The most flexible approach is to generate separate audio files in Murf - one per slide or one per section - and upload them as individual files in Canva. Canva supports multiple audio tracks on video designs, and you can position each track on the timeline to start at the corresponding slide transition. For presentations in Canva Pro, you can also assign audio per page. This per-section approach is more work to set up initially but gives you complete control over timing and makes it easy to update individual sections without regenerating the full narration.
How do I update the voiceover after changing my Canva design?
Open the original Murf project and edit only the blocks that correspond to the changed slides. Murf saves your voice selection, speed, and pause settings in the project, so you do not need to re-configure anything - just revise the script text for the affected blocks and regenerate those blocks only. Export the updated audio, return to Canva, delete the existing audio track, and upload the new version. For minor narration changes - a word or phrase revision - this takes under five minutes from Murf to Canva.
Does Canva play the voiceover automatically when sharing a presentation?
Yes, when you share a Canva presentation as a video or as a self-paced link (via “Present and record” or “View-only” share), the audio plays automatically. For live presentations where you are presenting to an audience, the audio will play during your presentation session unless you mute it. If you want the narration to play for remote viewers but not during your live delivery, export the narrated version as a video file from Canva and share that separately from the live presentation link.
Want to learn more about Murf AI?
Related Reading
- Murf AI Review
- Best AI Voice Generators for Content Creators
- AI Voiceover for YouTube Videos: Murf Workflow
Related Guides
- Getting Started with Murf AI
- Murf Studio Interface Walkthrough
- How to Clone Your Voice with Murf AI
- Murf Text-to-Speech Tutorial
- Choosing the Right AI Voice in Murf
- Murf AI Emotion Controls
- Murf AI Pronunciation and Emphasis
- Mastering Pacing in Murf AI
- Murf MultiNative: Multilingual Voiceovers
- Murf AI Dubbing Walkthrough
- AI Voiceover for YouTube Videos: Murf Workflow
- Murf AI eLearning Narration: Educator’s Guide
External Resources
- Murf AI Help Center - Official documentation for Murf Studio, voice generation, and exports
- Canva Help: Add Audio to a Design - Step-by-step from Canva on uploading audio tracks to videos and presentations
- Canva Design School - Free Canva tutorials covering presentations, social video, and design fundamentals
Related Guides
- AI Voiceover Corporate Training With WellSaid Labs
- AI Voiceover for YouTube Videos: Murf Workflow Guide 2026
- AI Voiceover Tips: Making Synthetic Voices Sound Human
- ElevenLabs Getting Started: Complete Beginners Guide
- ElevenLabs Voice Cloning Tutorial: Complete 2026 Guide
- Luma Dream Machine Video Tutorial 2026: Text-to-Video & Ray3
- Murf AI Custom Pronunciation: Say It My Way Guide (2026)
- Murf AI Dubbing: Complete Walkthrough | Complete Guide 2026
- Murf AI eLearning Narration: Educator's Guide | Review 2026
- Murf AI Emotion Control: Voice Guide | Review 2026