
The voiceover is done. The voice sounds great, the pacing is on point, and the script landed exactly the way you intended. Now you click Export - and your Murf AI export settings in the next thirty seconds determine whether your audio holds up in production or causes problems the moment it hits your editing timeline, your podcast host, or your learning management system.
Murf AI (full Murf review) gives you meaningful control over export format and quality settings, and those choices are not interchangeable. MP3 at 128 kbps might work perfectly for a YouTube video but introduce audible artifacts when a video editor layers it under music. WAV is the right call for broadcast delivery but wastes storage for a podcast episode. Getting this right is quick once you understand the logic behind each option - and getting it wrong means extra conversion steps, quality loss, or compatibility issues downstream.
This guide covers the full range of murf ai export settings - audio formats, quality parameters, batch workflows, subtitle exports, and platform-specific recommendations. It is written for beginners who want to produce professional output from day one without working through the options by trial and error.
Overview of Murf AI Export Settings
Murf AI Export Settings covers the strategies and tools that deliver real productivity gains in this space. The voiceover is done. The voice sounds great, the pacing is on point. This guide walks through the practical steps from setup through advanced optimization.
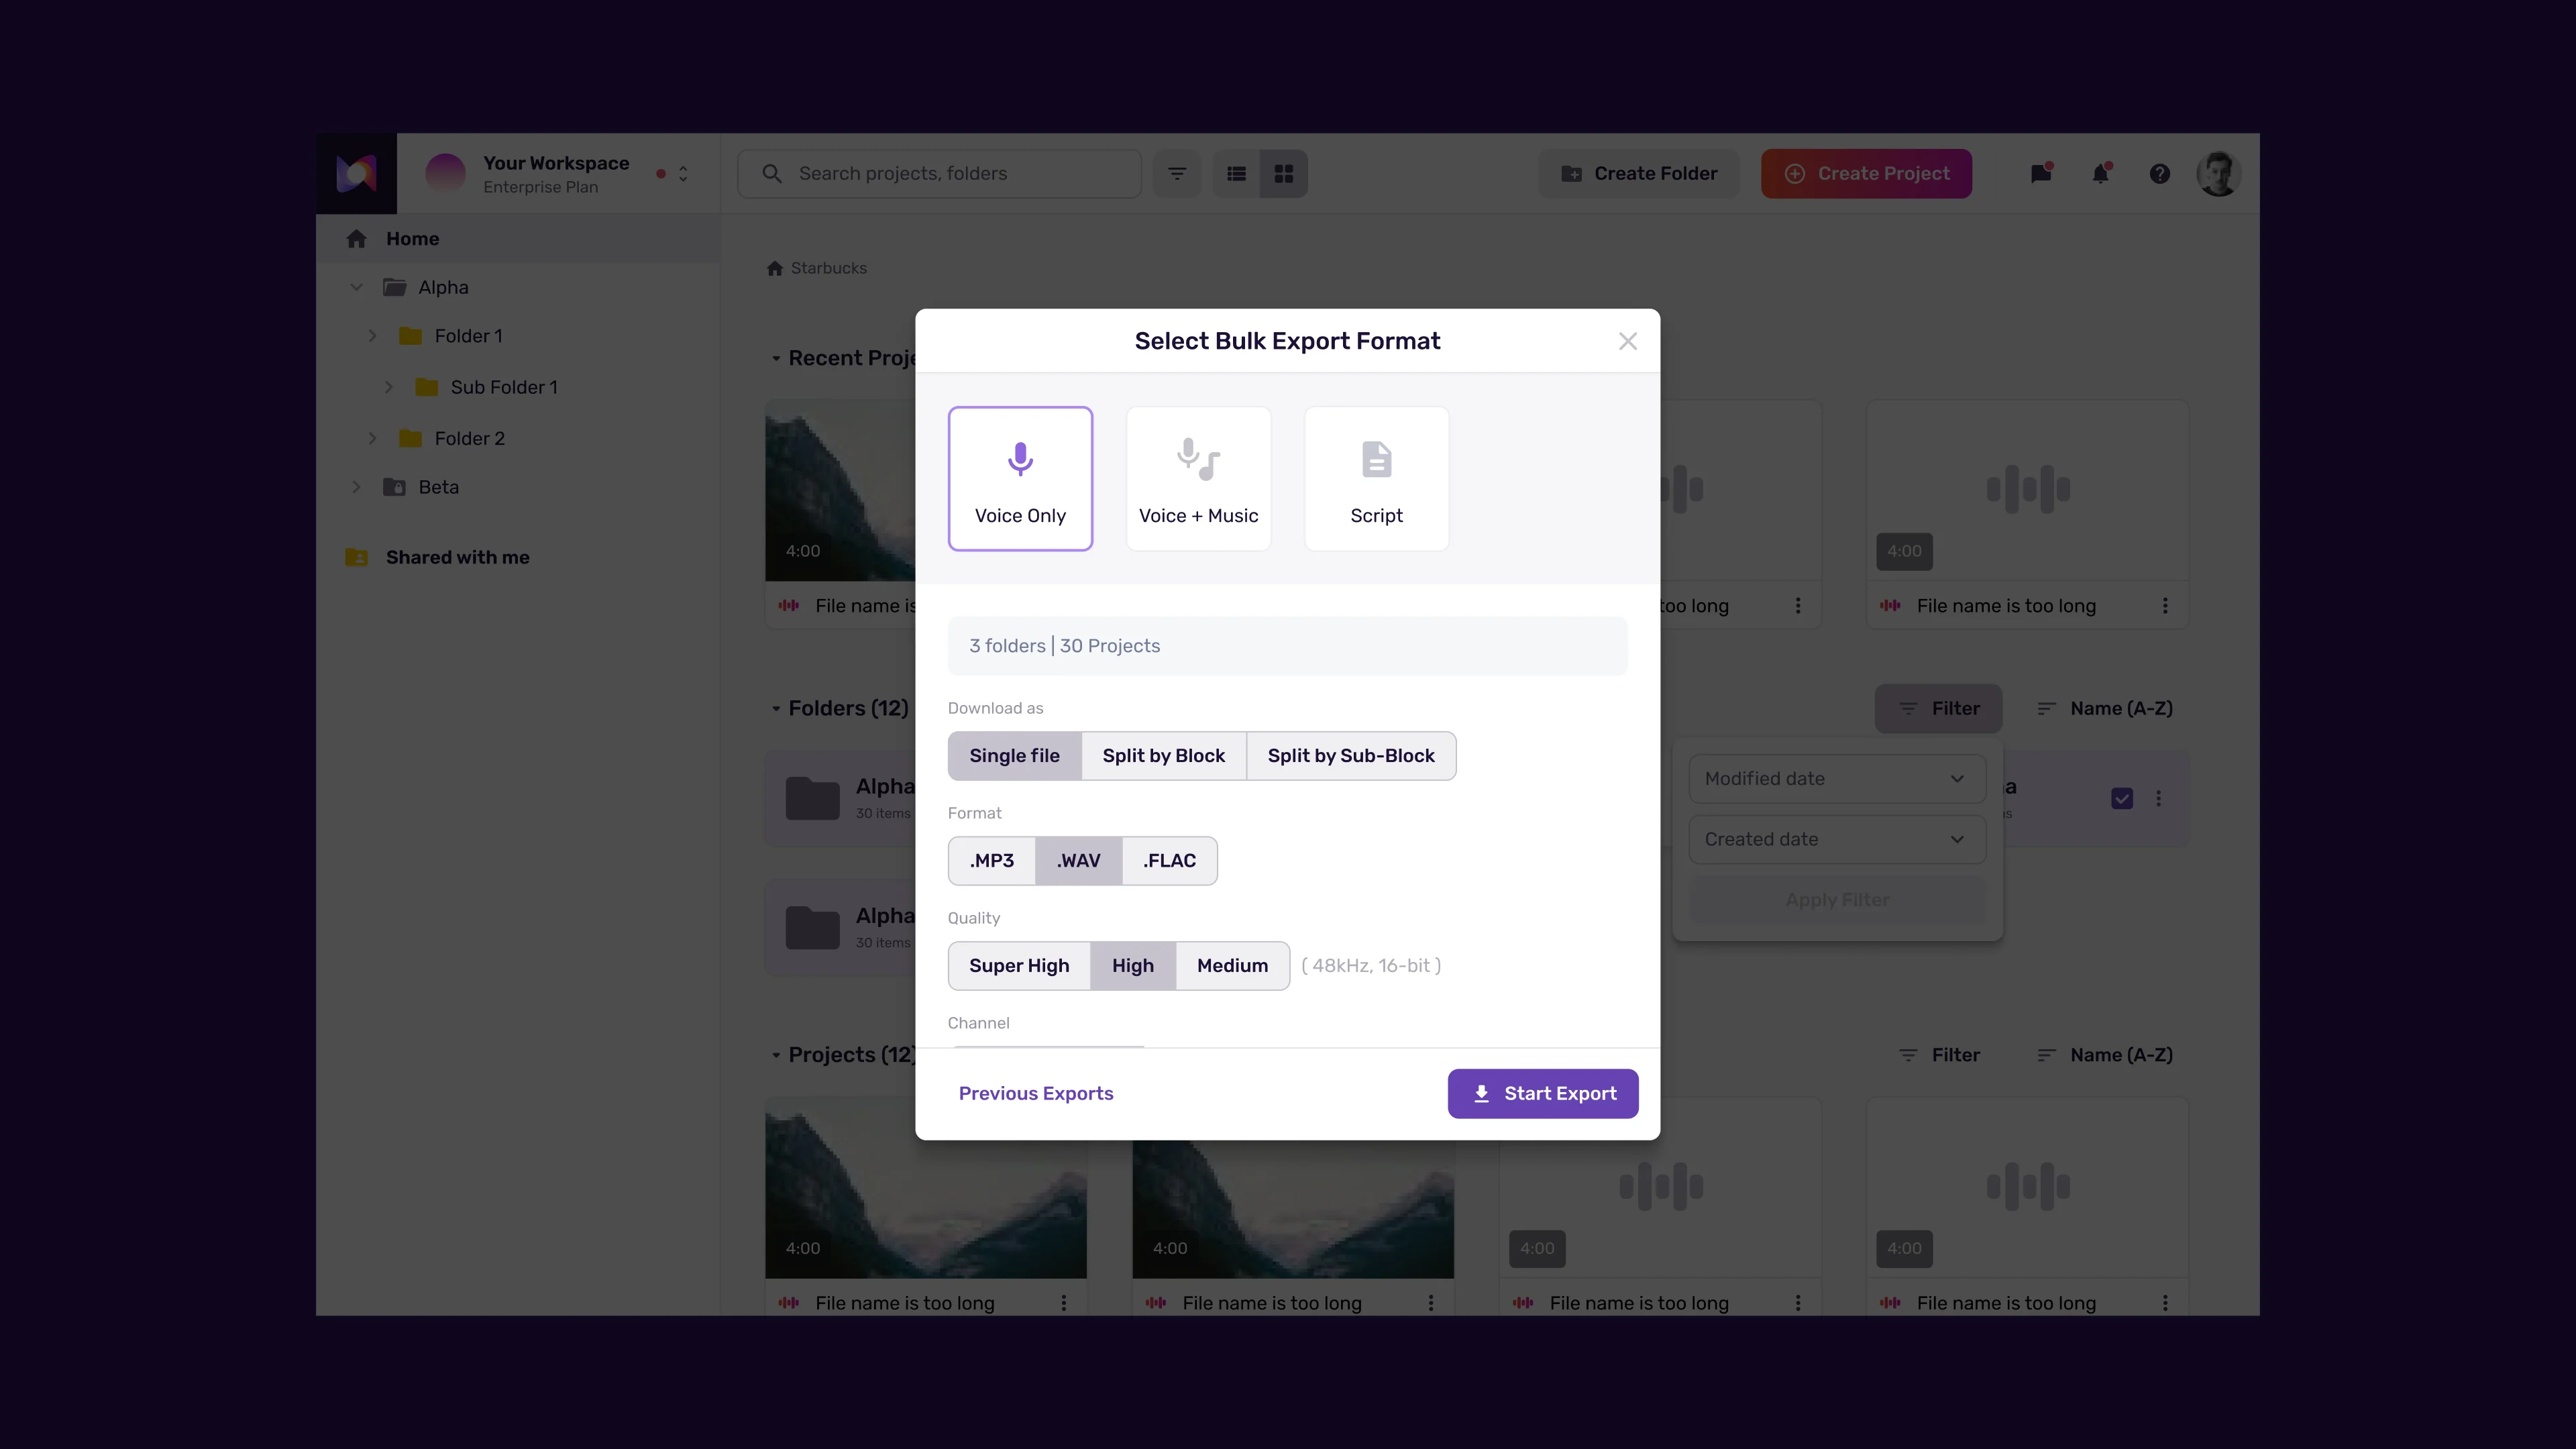
Every Murf project reaches the export panel through the same path - finish editing in the Studio, click the Export button in the top-right corner, and the export dialog opens. The options you see depend on your plan tier, but the layout and logic are consistent across all plans.
What you can control at export time:
- Format - The audio container: MP3, WAV, or FLAC depending on your plan
- Quality - The sample rate and bit rate for the output file
- Content scope - Export the full project, individual tracks, or selected clips
- Subtitles and transcripts - Optional SRT, VTT, or plain-text transcript alongside the audio
- Video with voiceover - If you have combined video in the Studio, export as MP4
Plan access by format:
| Format | Free Plan | Basic | Pro | Business/Enterprise |
|---|---|---|---|---|
| MP3 (Standard) | Yes | Yes | Yes | Yes |
| MP3 (HD) | No | Yes | Yes | Yes |
| WAV | No | Yes | Yes | Yes |
| FLAC | No | No | Yes | Yes |
| Video (MP4) | No | Yes | Yes | Yes |
The free plan restricts exports to standard-quality MP3 (see our free plan maximization tips for getting the most from it). If you need WAV or FLAC for professional production workflows, you need at least the Basic or Pro plan. See the Murf pricing page for a full tier comparison.
Where to find your exported files:
Murf exports download directly to your browser’s default download folder. There is no automatic cloud storage of exported files - your project files stay in Murf Studio, but the exported audio sits locally on your machine. Create a clear folder structure immediately after download to avoid the common problem of losing track of which export corresponds to which project version.
Audio Formats Available: MP3, WAV, and FLAC
Understanding what each format does - technically and practically - makes the choice obvious for any given use case. These are not just different containers for the same data. Each format represents a different trade-off between file size, quality, and compatibility.
MP3
MP3 uses lossy compression. The encoder discards audio data that psychoacoustic models predict the human ear will not miss - frequencies masked by louder sounds, very high or very low frequencies, phase information in complex audio. The result is a file that is significantly smaller than the original, typically 5 to 10 times, at the cost of some audio information.
For most voiceover delivery, this trade-off is acceptable. The human voice sits in the 80 Hz to 8 kHz range for speech fundamentals, and MP3 handles this range well at standard quality settings. Listeners on phones, laptops, and most playback devices will not hear a meaningful difference between a high-quality MP3 and a WAV at normal listening volumes.
When MP3 is the right choice:
- YouTube, TikTok, Instagram Reels, and other video platforms that transcode your audio anyway
- Podcast episodes uploaded to Spotify for Podcasters, Apple Podcasts, or Buzzsprout (see our podcast intro and outro guide for production tips)
- Web-based content, landing page audio, and embedded players
- Mobile apps with storage or bandwidth constraints
- Situations where the audio will not be further edited or mixed
When MP3 creates problems:
- Audio post-production where the file will be processed, mixed, or compressed again - re-compressing lossy audio introduces generation loss
- Broadcast delivery specifications that require uncompressed audio
- Projects where the audio sits under music and the combined compression budget matters
WAV
WAV stores uncompressed PCM audio. Every sample is preserved at full resolution. There is no lossy compression, no discarded data, and no generational quality loss when the file is processed. A 60-second WAV file at 44.1 kHz and 16-bit depth is approximately 10 MB, compared to roughly 1 MB for the same content as a standard-quality MP3.
WAV is the professional standard for audio delivery and post-production for a reason. It is compatible with every digital audio workstation, every broadcast system, and every professional video editing suite. When audio quality is genuinely critical or when the file will be edited further, WAV removes all format-related variables from the equation.
When WAV is the right choice:
- Professional video production in Premiere Pro, Final Cut, DaVinci Resolve, or Avid
- Broadcast delivery for television, radio, or streaming services with technical specs
- Audio that will be mixed with music, sound effects, or other audio layers
- E-learning courses (covered in our eLearning narration guide) exported to platforms with high-quality audio requirements
- Any situation where you may need to re-process, re-export, or archive the master
When WAV is overkill:
- Direct uploads to YouTube, Spotify, or social platforms that compress on ingest
- Large-scale projects where storage is a real constraint
- Mobile or web delivery where the extra file size adds no perceptible quality benefit
FLAC
FLAC uses lossless compression. Unlike MP3, no audio data is discarded - the full original quality is preserved, but the file is compressed to roughly 50 to 60 percent of the WAV size. A FLAC file decompresses to bit-identical audio compared to the source WAV.
FLAC is available on Murf’s Pro plan and above. Its practical uses are narrower than either MP3 or WAV for most voiceover workflows. It is most relevant for archival purposes - preserving full-quality audio in a storage-efficient format - and for workflows where lossless audio is a requirement but WAV files are impractically large.
When FLAC makes sense:
- Long-form audio archives where preserving full quality with reasonable storage is the goal
- Workflows that explicitly require lossless format but need smaller file sizes than WAV
- Situations where the destination software supports FLAC natively
For most practical voiceover production, the choice is between MP3 for convenience and WAV for quality. FLAC sits in a specialized middle ground.
Quality Settings Explained
Beyond choosing a format, Murf gives you control over the technical quality parameters that determine how much audio information your export contains. These settings interact with your format choice to determine the final output.
Sample Rate
Sample rate measures how many times per second the audio signal is sampled - expressed in kHz (kilohertz). Higher sample rates capture more of the original signal, particularly at higher frequencies.
| Sample Rate | Frequency Range | Use Case |
|---|---|---|
| 22.05 kHz | Up to ~11 kHz | Voice-only content, small file size priority |
| 44.1 kHz | Up to ~22 kHz | Standard CD quality - most voiceover and music delivery |
| 48 kHz | Up to ~24 kHz | Video production standard - matches most video editing workflows |
For voiceover work, 44.1 kHz is the default that covers virtually every use case. The human voice does not produce meaningful content above 10 to 12 kHz, so the difference between 44.1 and 48 kHz is imperceptible for speech. Choose 48 kHz if the audio is going directly into a video project, since most video editing software works natively at 48 kHz and choosing a matching sample rate avoids any resampling conversion.
Bit Rate (MP3)
For MP3 exports, bit rate determines how much data is used per second of audio. Higher bit rates preserve more of the original signal after lossy compression.
| Bit Rate | File Size (per minute) | Quality Level | Best For |
|---|---|---|---|
| 128 kbps | ~1 MB | Standard - acceptable for voice | Web, social media, podcasts |
| 192 kbps | ~1.4 MB | Good - noticeable improvement | YouTube, presentations, LMS |
| 256 kbps | ~1.9 MB | Very good - diminishing returns | Professional delivery, mixed audio |
| 320 kbps | ~2.4 MB | Maximum MP3 quality | Archival, broadcast-adjacent delivery |
For voice-only content, 128 kbps to 192 kbps covers the vast majority of use cases. The improvements above 192 kbps are real but very small for speech - the gains matter more when the audio includes music, which has a much wider frequency range and more complex transients that benefit from higher bit rates.
Bit Depth (WAV and FLAC)
Bit depth determines the dynamic range of the audio - the ratio between the loudest and quietest sounds the file can represent.
- 16-bit - 96 dB dynamic range. Standard for CD, streaming, and most professional delivery.
- 24-bit - 144 dB dynamic range. Standard for recording and post-production. Necessary if the audio will be processed in a DAW.
For final delivery, 16-bit at 44.1 kHz is the industry standard and sufficient for all listening contexts. Use 24-bit if the audio will be edited, mixed, or processed further - the additional headroom prevents clipping when processing adds gain.
Tip 1: Choose the Right Format for Your Platform
The fastest way to make the right export decision is to start from your destination platform and work backward. Different platforms have different ingest specs, compression pipelines, and quality expectations - exporting to match those specs eliminates conversion steps and quality loss.
Platform ingest and the case for MP3:
Video platforms including YouTube, Instagram, TikTok, and Vimeo compress all uploaded audio using their own codecs. This means your carefully chosen WAV file gets re-encoded on upload anyway. Exporting a high-quality MP3 (192 kbps or above) for these platforms produces output that is indistinguishable from WAV after the platform’s compression pass - and your WAV file’s extra quality gets discarded in the process. Save the WAV for situations where you control the full delivery chain.
Podcast hosts and MP3:
Podcast hosting platforms including Buzzsprout, Podbean, Libsyn, and Spotify for Podcasters all accept MP3 and many re-encode uploads to their own delivery specs anyway. Export at 128 kbps for voice-only episodes and 192 kbps if there is music or audio variety. WAV is not necessary for podcast delivery.
Video editing and WAV:
If your voiceover (perhaps generated via the Canva integration workflow) is going into a video editing timeline in Premiere Pro, Final Cut Pro, or DaVinci Resolve, export WAV at 48 kHz to match the standard video project sample rate. Your editing software will not need to resample the audio, and you preserve full quality for any post-production processing.
LMS platforms and quality matching:
Learning management systems vary widely in their audio requirements. Articulate Storyline and Rise accept both MP3 and WAV. Teachable and Thinkific compress audio on upload. Canvas and Moodle support WAV for full-quality delivery. Check your specific platform’s documentation before exporting - if the platform compresses on upload, high-quality MP3 is usually sufficient.
Tip 2: Select Quality Based on Use Case
Rather than defaulting to the highest available quality for every export, matching quality to the actual requirements of each project saves storage, simplifies file management, and avoids the false security of exporting WAV to destinations that do not benefit from it.
A practical quality selection framework:
High priority quality (WAV 44.1/48 kHz, 24-bit or FLAC):
- Professional video production with post-production processing
- Broadcast delivery
- Master archive copies of important projects
- Mixed audio where voice sits alongside music layers
Standard quality (MP3 192-256 kbps or WAV 44.1 kHz 16-bit):
- E-learning courses on platforms that deliver audio directly without re-encoding
- Corporate training videos for internal distribution
- Presentations with audio narration
- Podcast content for direct RSS delivery
Efficient quality (MP3 128-192 kbps):
- Social media video narration
- YouTube and video platform uploads
- Web-based audio players and landing pages
- Demo and review files
One important rule: Never re-export a lossy file to a new lossy format. If you have an MP3 export that needs to be in a different format, go back to Murf and re-export directly from the source project. Processing an MP3 through another lossy encoder layers two rounds of quality loss.
Tip 3: Batch Export Multiple Tracks
For projects with multiple narration tracks - a multi-module course, a series of product videos, or a batch of social media clips - Murf’s export workflow handles multiple outputs more efficiently than exporting one at a time.
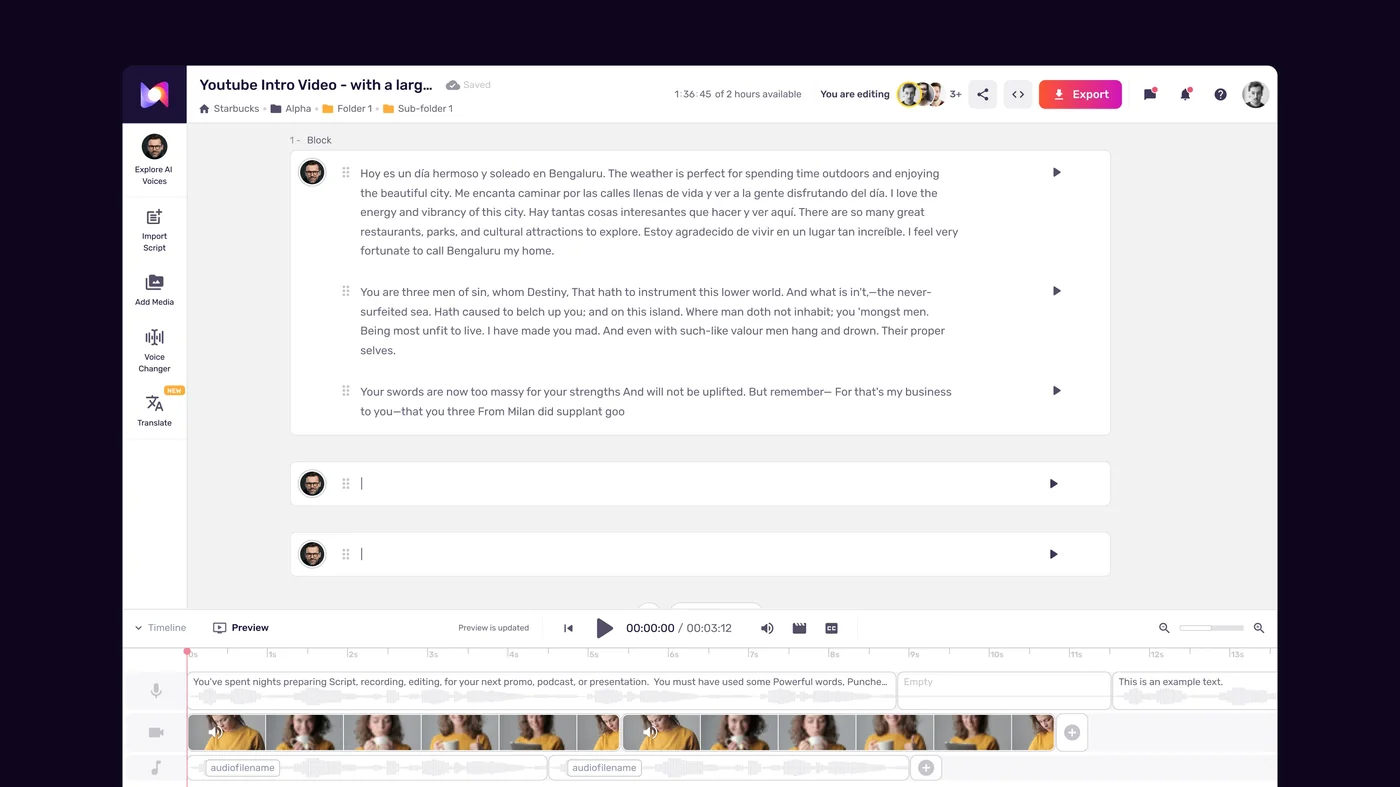
How Murf handles multi-track projects:
Inside the Studio editor, a single project can contain multiple slides or sections, each with its own narration block. When you export from a multi-track project, you can export all tracks as a single combined audio file, export each track as a separate file, or select specific tracks for export. This structure makes Murf well-suited for course narration workflows where each lesson module is a separate export.
Setting up for efficient batch export:
Organize your project with clear section names before you begin generating. Murf’s export dialog uses your section names as file names for individual track exports - descriptive names like “Module-1-Intro” rather than “Section 1” save renaming work after download.
Step-by-step batch export process:
- Complete all narration blocks in the project and verify each one with a preview before running the full export
- Open the export dialog and select “Export all tracks separately” if you need individual files
- Confirm that format and quality settings are consistent across all tracks - you cannot apply different settings to different tracks in a single export batch
- Set the format to WAV if these tracks are going into a video editor, or MP3 at your target bit rate for direct delivery
- Click Export and allow the batch to complete before closing the browser tab
- Verify file count and names immediately after download to confirm all tracks exported correctly
For large course projects:
If you are producing 10 or more modules in a single session (the eLearning narration guide covers the production cadence in depth), consider grouping related modules into separate projects rather than one very large project. Murf’s project structure handles large projects, but smaller organized batches are easier to manage and troubleshoot if an individual track needs to be regenerated.
Naming consistency matters:
Establish a naming convention before you start - [CourseName]-[ModuleNumber]-[TopicSlug] works well. Consistent naming makes it straightforward to match audio files to their corresponding video files or LMS upload slots when you are working through a large batch.
Tip 4: Export Subtitles and Transcripts Alongside Audio
One of Murf’s less-discussed export features is its subtitle and transcript output. Every voiceover you generate has a corresponding text - the script you typed - and Murf can export this alongside the audio in formats that plug directly into video editors, content management systems, and accessibility workflows.
Available subtitle and transcript export formats:
- SRT - SubRip Text, the standard subtitle format supported by YouTube, Vimeo, most video editors, and LMS platforms. Contains timestamped text segments synced to the audio.
- VTT - WebVTT, the web standard for HTML5 video captions. Use this for web-based video players.
- Plain text transcript - The raw script without timestamps, useful for blog post transcripts, SEO content, and accessible text alternatives.
How to export subtitles in Murf:
In the export dialog, look for the subtitle or caption export option alongside the audio format settings. Enable this before clicking Export - it adds the subtitle file to your download alongside the audio. The timestamps in SRT and VTT files are automatically generated based on the voiceover timing, so they sync accurately without any manual adjustment.
Why subtitle export matters for YouTube:
YouTube auto-generates captions for uploaded videos, but the accuracy varies - especially for technical terms, product names, and non-standard vocabulary. Uploading an SRT file from Murf provides precise captions derived from your actual script, which improves accessibility, improves search indexing (YouTube indexes caption text), and eliminates the need to manually correct auto-generated captions after upload.
Why it matters for e-learning:
Section 508 compliance and WCAG 2.1 guidelines require accessible alternatives for audio content in educational settings. Exporting transcripts from Murf at the same time as the audio file keeps accessibility deliverables in sync with content creation rather than becoming a separate catch-up task. Most LMS platforms have a dedicated field for transcript upload alongside audio or video content.
Practical workflow tip:
Make subtitle export part of your default export checklist rather than an optional add-on. Even if you do not immediately need the subtitle file, having it available costs nothing and becomes useful more often than expected - particularly when repurposing voiceover content into written format or when a client or platform requests captions after the fact.
Platform-Specific Export Recommendations
These recommendations translate the general format guidance into direct settings for the most common destinations for Murf voiceover exports.
| Platform | Format | Sample Rate | Bit Rate / Bit Depth | Notes |
|---|---|---|---|---|
| YouTube | MP3 | 44.1 kHz | 192 kbps | YouTube re-encodes on upload; WAV provides no advantage |
| Podcast (Spotify, Apple) | MP3 | 44.1 kHz | 128 kbps | Voice-only; platform compresses on ingest |
| Podcast (direct RSS) | MP3 | 44.1 kHz | 192 kbps | Listeners get your file directly; higher quality appropriate |
| Premiere Pro / Final Cut | WAV | 48 kHz | 24-bit | Match video project sample rate; preserve quality for mixing |
| DaVinci Resolve | WAV | 48 kHz | 24-bit | Same logic as Premiere; 48 kHz is the Resolve default |
| Articulate Storyline | WAV or MP3 | 44.1 kHz | 16-bit / 192 kbps | WAV for mixed audio modules; MP3 for voice-only |
| Teachable / Thinkific | MP3 | 44.1 kHz | 192 kbps | Platforms compress video on upload; MP3 sufficient |
| Canva | MP3 | 44.1 kHz | 128 kbps | Canva’s audio handling does not benefit from WAV |
| TikTok / Instagram Reels | MP3 | 44.1 kHz | 192 kbps | Platforms apply heavy compression; WAV provides no advantage |
| Murf API (programmatic) | WAV or MP3 | 44.1 kHz | Per API spec | Match the consuming application’s expected format |
| Radio / broadcast | WAV | 48 kHz | 24-bit | Uncompressed is typically a hard requirement |
| Facebook / LinkedIn video | MP3 | 44.1 kHz | 192 kbps | Both platforms re-encode; MP3 export is sufficient |
The YouTube and social media principle:
Any platform that transcodes your video on ingest - which includes YouTube, TikTok, Instagram, and Facebook - applies its own audio compression after upload. This means the difference between your MP3 and your WAV disappears at the point of delivery. Export WAV for platforms where your audio file is delivered directly to the listener without a transcoding step in between.
The video editing principle:
When the audio is going into a professional editing timeline, export WAV at the project’s native sample rate. This avoids resampling during import, preserves the full dynamic range for any processing, and prevents generational quality loss if the project requires multiple export rounds during revision.
The API consideration:
If you are using the Murf API (covered in our Falcon API quickstart) to generate audio programmatically, the format decision should match what your application or pipeline expects on the receiving end. Check whether your API consumer handles WAV or MP3 more efficiently - some real-time playback applications prefer MP3 for its smaller size and faster streaming, while storage-and-forward systems work equally well with either.
Frequently Asked Questions
What is the difference between Murf’s standard and HD export quality?
Standard quality MP3 export is available on the free plan and produces audio suitable for web, social media, and podcast delivery. HD quality - available on paid plans - uses a higher bit rate and improved encoding that benefits mixed audio scenarios where the voiceover will be combined with music or layered sound. For voice-only content on streaming platforms, the difference is minimal. For professional video production where audio quality is critically important, HD export is the right choice.
Can I change the export format after generating the voiceover?
Yes. Your project remains in Murf Studio and can be exported again in a different format at any time, as long as you have not made changes to the script or regenerated the audio. Exporting does not consume your monthly generation minutes - only generating new audio does. You can export the same project in MP3, WAV, and FLAC without any additional cost or usage impact, which makes it practical to produce both a WAV for your editor and an MP3 for direct distribution from the same session.
Does Murf’s export quality affect voice naturalness or speech intelligibility?
Not in a meaningful way for standard quality settings. Murf generates audio at high internal quality before applying export compression, so the naturalness of the voice delivery is determined during generation, not at export time. The export format and quality settings affect the fidelity of the audio file itself - frequency response, dynamic range, and artifact levels - rather than the character of the voice synthesis. A standard-quality MP3 of a well-generated Murf voiceover sounds better than a WAV of a poorly generated one.
Should I use FLAC instead of WAV for archiving Murf voiceover projects?
FLAC is a reasonable archival choice if storage efficiency matters and you have Pro plan access. FLAC preserves full audio quality - the decoded audio is bit-identical to the WAV source - while reducing file size by roughly 40 to 50 percent. The practical consideration is compatibility: WAV opens in every audio application without any special codec support, while FLAC requires compatible software. For long-term archival where you want both quality preservation and storage efficiency, FLAC is the better technical choice. For day-to-day production workflows where file handoffs and compatibility matter, WAV is simpler.
Does exporting in WAV rather than MP3 affect how the audio sounds on YouTube?
No. YouTube re-encodes all uploaded audio using its own codec and bit rate settings, regardless of whether you uploaded MP3 or WAV. Both formats sound identical to viewers after YouTube’s processing pipeline. The only difference is upload file size and the time it takes to upload. For YouTube specifically, a high-quality MP3 (192 kbps or above) is the practical export choice - you get the same result with a much smaller upload.
How do I export multiple voiceover tracks with consistent quality settings?
In Murf Studio, the export dialog applies the same format and quality settings to all tracks exported in a single batch - there is no per-track format selection within one export operation. If you need different formats for different tracks (for example, WAV for some and MP3 for others), export the relevant groups separately. For most multi-track projects like course narration or video series, consistent quality settings are actually preferable - standardized output simplifies the downstream workflow significantly.
Want to learn more about Murf AI?
Related Reading
Related Guides
- Getting Started with Murf AI
- Murf Studio Interface Walkthrough
- How to Clone Your Voice with Murf AI
- Murf Text-to-Speech Tutorial
- Choosing the Right AI Voice in Murf
- Murf AI Emotion Controls
- Murf AI Pronunciation and Emphasis
- Mastering Pacing in Murf AI
- Murf MultiNative: Multilingual Voiceovers
- Murf AI Dubbing Walkthrough
- AI Voiceover for YouTube Videos: Murf Workflow
- Murf AI eLearning Narration: Educator’s Guide
- Murf AI Canva Integration
- Murf Falcon API Tutorial
- Murf AI Free Plan Tips
- Murf AI Voice Changer Guide
- Murf AI Podcast Intro Guide
- Murf AI Google Slides Voiceover
- Murf AI Voice Agent API
- Write Scripts for AI Voice: Murf Tips
- Murf AI Team Collaboration Guide
- Murf AI Marketing Voiceover Workflow
- Murf AI Custom Pronunciation Guide
- Murf AI Natural Sounding Voice Tips
External Resources
- Murf AI Help Center - Official documentation for Studio export options, audio formats, and quality settings
- FLAC Format Comparison - Reference comparison of FLAC against MP3 and WAV from the format’s maintainers
- Comparison of Audio Coding Formats - Overview of compression, bit rate, and quality across major audio codecs
Related Guides
- AI Voiceover Corporate Training With WellSaid Labs
- AI Voiceover for YouTube Videos: Murf Workflow Guide 2026
- AI Voiceover Tips: Making Synthetic Voices Sound Human
- ElevenLabs Getting Started: Complete Beginners Guide
- ElevenLabs Voice Cloning Tutorial: Complete 2026 Guide
- Luma Dream Machine Video Tutorial 2026: Text-to-Video & Ray3
- Murf AI Canva Integration: Add Voiceovers to Designs
- Murf AI Custom Pronunciation: Say It My Way Guide (2026)
- Murf AI Dubbing: Complete Walkthrough | Complete Guide 2026
- Murf AI eLearning Narration: Educator's Guide | Review 2026