



The Murf AI studio workspace is where your scripts become voiceovers. If you have just signed up for Murf and are staring at the editor wondering what everything does, this walkthrough will get you oriented in about 15 minutes. The interface packs a lot of functionality into a single screen - script editing, voice selection, timeline controls, a media library, and export options - but once you understand the layout, the workflow becomes intuitive.
This murf ai studio workspace walkthrough covers every major panel and control in the editor. You will learn where to write and import scripts, how to select and customize voices - Murf focuses on synthesised AI speech rather than voice cloning from recordings, and Murf Dub handles the separate multilingual workflow - how to use the timeline for multi-scene projects, where to find background music and media, and how to configure text-to-speech export settings for different output formats. Each section includes the specific buttons and menus you need to find, so you can follow along with Murf open in another tab.
If you have not created your account yet, the Murf AI Getting Started Guide walks through signup, Murf AI payment setup, and your first project. For broader context on how Murf compares to other voice generators, see our best AI voice generators roundup. This guide assumes you already have an account and can see the studio editor.
Murf AI Studio Workspace Overview
When you open a project in Murf, the studio workspace loads as a single-page editor with several distinct regions. Understanding the layout before you start clicking saves time and prevents the confusion that comes from accidentally changing settings you did not mean to touch.
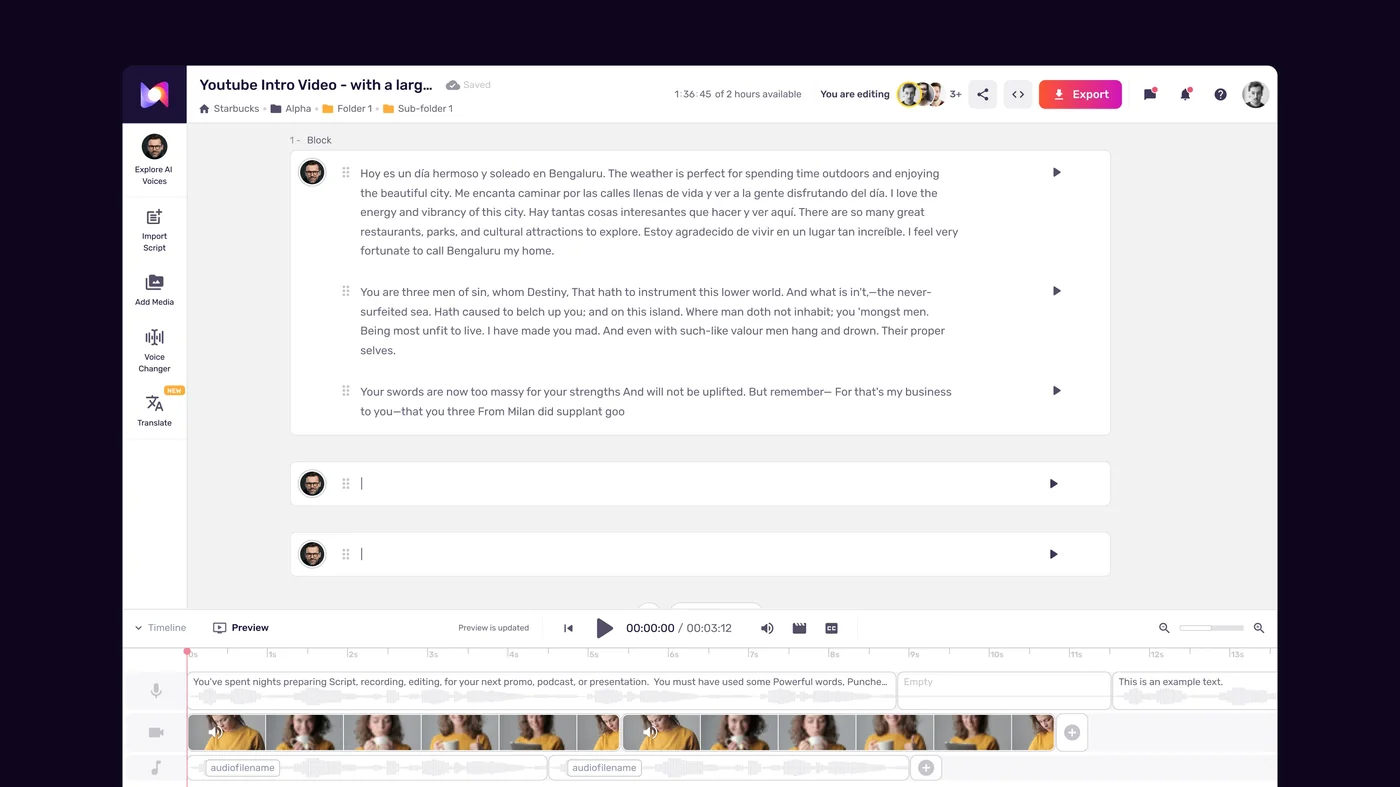
The workspace is divided into four main areas that you will interact with constantly.
The top navigation bar spans the full width of the screen. It contains your project name, undo and redo buttons, collaboration controls, and the main menu for project-level settings like renaming, duplicating, or deleting projects. The preview and export buttons also live here.
The script editor occupies the center-left portion of the screen. This is where you type or paste your text, and where most of your time goes during content creation. Each block of text in the editor corresponds to a scene on the timeline below.
The voice and customization panel sits on the right side. It displays the currently selected voice, along with sliders and controls for adjusting speed, pitch, pause duration, and emphasis. When you select a different text block, this panel updates to show the voice settings for that specific scene.
The timeline runs along the bottom of the screen. It shows your scenes in sequence, with waveform previews of generated audio, background music tracks, and media elements. You drag, trim, and reorder content here.
These four areas work together. You write in the editor, configure the voice in the right panel, generate audio, and arrange everything on the timeline. For teams comparing text-to-speech pricing across platforms - including alternatives like ElevenLabs pricing - understanding what each section controls makes plan selection easier, especially when you are benchmarking AI voice generator prices or confirming Murf commercial use rights for client deliverables. The media library opens as an overlay when you need background music or images. If you are weighing alternatives, our ElevenLabs alternatives roundup covers where Murf and other providers fit.
Navigating the Top Bar
The top navigation bar is easy to overlook because it looks minimal, but it controls several important functions. Walk through it from left to right.
Project name. Click the project name in the top-left corner to rename it. Use descriptive names like “Product Demo Q2” or “Training Module 3” rather than “Untitled Project” - this matters when you have dozens of projects in your account.
Undo and Redo. The arrow buttons next to the project name let you step backward and forward through your recent changes. These work for text edits, voice changes, and timeline adjustments. The keyboard shortcuts Ctrl+Z (undo) and Ctrl+Shift+Z (redo) also work.
Scene navigation. Next to the undo controls, you will find arrows or a dropdown that lets you jump between scenes in your project. For longer projects with 10 or more scenes, this is faster than scrolling through the editor or clicking on the timeline.
Collaboration. If you are on the Business plan, the share button lets you invite team members as editors or viewers. Editors can modify the script and voice settings. Viewers can play back and leave comments. Click the share icon to generate an invite link or enter email addresses. The Murf Canva integration guide and Murf Google Slides voiceover guide cover handing finished audio off to design tools your collaborators already use.
Preview. The play button in the top bar plays your entire project from the beginning. Use this for a final review before exporting. You can also preview individual scenes by clicking the play button within each text block.
Export. The export button in the top-right corner opens the export panel where you choose output format, quality settings, and download the final file. More on this in the settings and export section below.
The Script Editor
The script editor is the largest panel in the workspace, and it is where most of your creative work happens. Navigate to it by clicking anywhere in the center-left area of the screen.
Adding text. Click inside the editor and start typing, or paste text from another document. Murf processes text in blocks, and each block becomes a separate scene on the timeline. To create a new scene, click the “Add Scene” button below the current text block or press Enter twice to insert a scene break.
Scene structure. Each scene in the editor appears as a distinct card with its own text area, voice assignment, and playback controls. You can think of scenes as paragraphs or sections of your voiceover. A 2-minute product demo might have 4 to 6 scenes, while a 10-minute training narration could have 15 to 20.
Importing scripts. If you have already written your script in Google Docs, Word, or a text file, click the import button near the top of the editor to bring in your text. Murf splits imported text into scenes based on paragraph breaks. Review the scene breaks after importing and adjust if the automatic splitting does not match your intended pacing.
Editing within scenes. Click on any scene card to select it and edit the text. The voice panel on the right updates to show the settings for the selected scene. This means you can assign different voices to different scenes - useful for dialogue, multilingual content, or projects where different sections need different tones.
Scene reordering. Drag scene cards up or down in the editor to change their order, or use the timeline at the bottom. The editor and timeline stay synchronized, so reordering in one automatically updates the other.
Generate button. After writing or editing text in a scene, click the “Generate” button on that scene card to produce the AI voiceover. You can generate scenes individually or use “Generate All” to process every scene at once. Individual generation is useful when iterating on a specific section without waiting for the entire project to regenerate. For developers wiring this into a programmatic workflow, the Murf Falcon API tutorial shows how to skip the UI entirely.
Character and time estimates. The editor displays a character count and estimated audio duration for each scene. Keep an eye on these if you are on a plan with monthly generation limits.
The Voice Panel and Murf AI Studio Workspace Controls
The voice panel on the right side of the workspace is where you fine-tune how your voiceover sounds. Select a scene in the editor, and the panel updates to show the controls for that specific scene.
Voice selection. Click the voice name or the “Change Voice” button at the top of the panel to open the voice library. Murf offers over 200 AI voices across 35 languages, powered by Speech Gen 2 technology. The library lets you filter voices by language, accent, age range, gender, and use case - our Murf voice selection tips guide walks through a structured process for narrowing down candidates. Preview any voice by clicking the play icon next to its name. When you find one you like, click “Select” to assign it to the current scene.
Speed control. The speed slider adjusts how fast the voice speaks. The default is 1.0x, and you can typically adjust between 0.5x and 2.0x. For most voiceover work, stay between 0.8x and 1.2x. Going slower than 0.8x can introduce unnatural stretching in the audio, and going faster than 1.3x can sacrifice clarity. Training narrations generally work best around 0.9x to 1.0x. Marketing content can push to 1.1x for energy without losing comprehension.
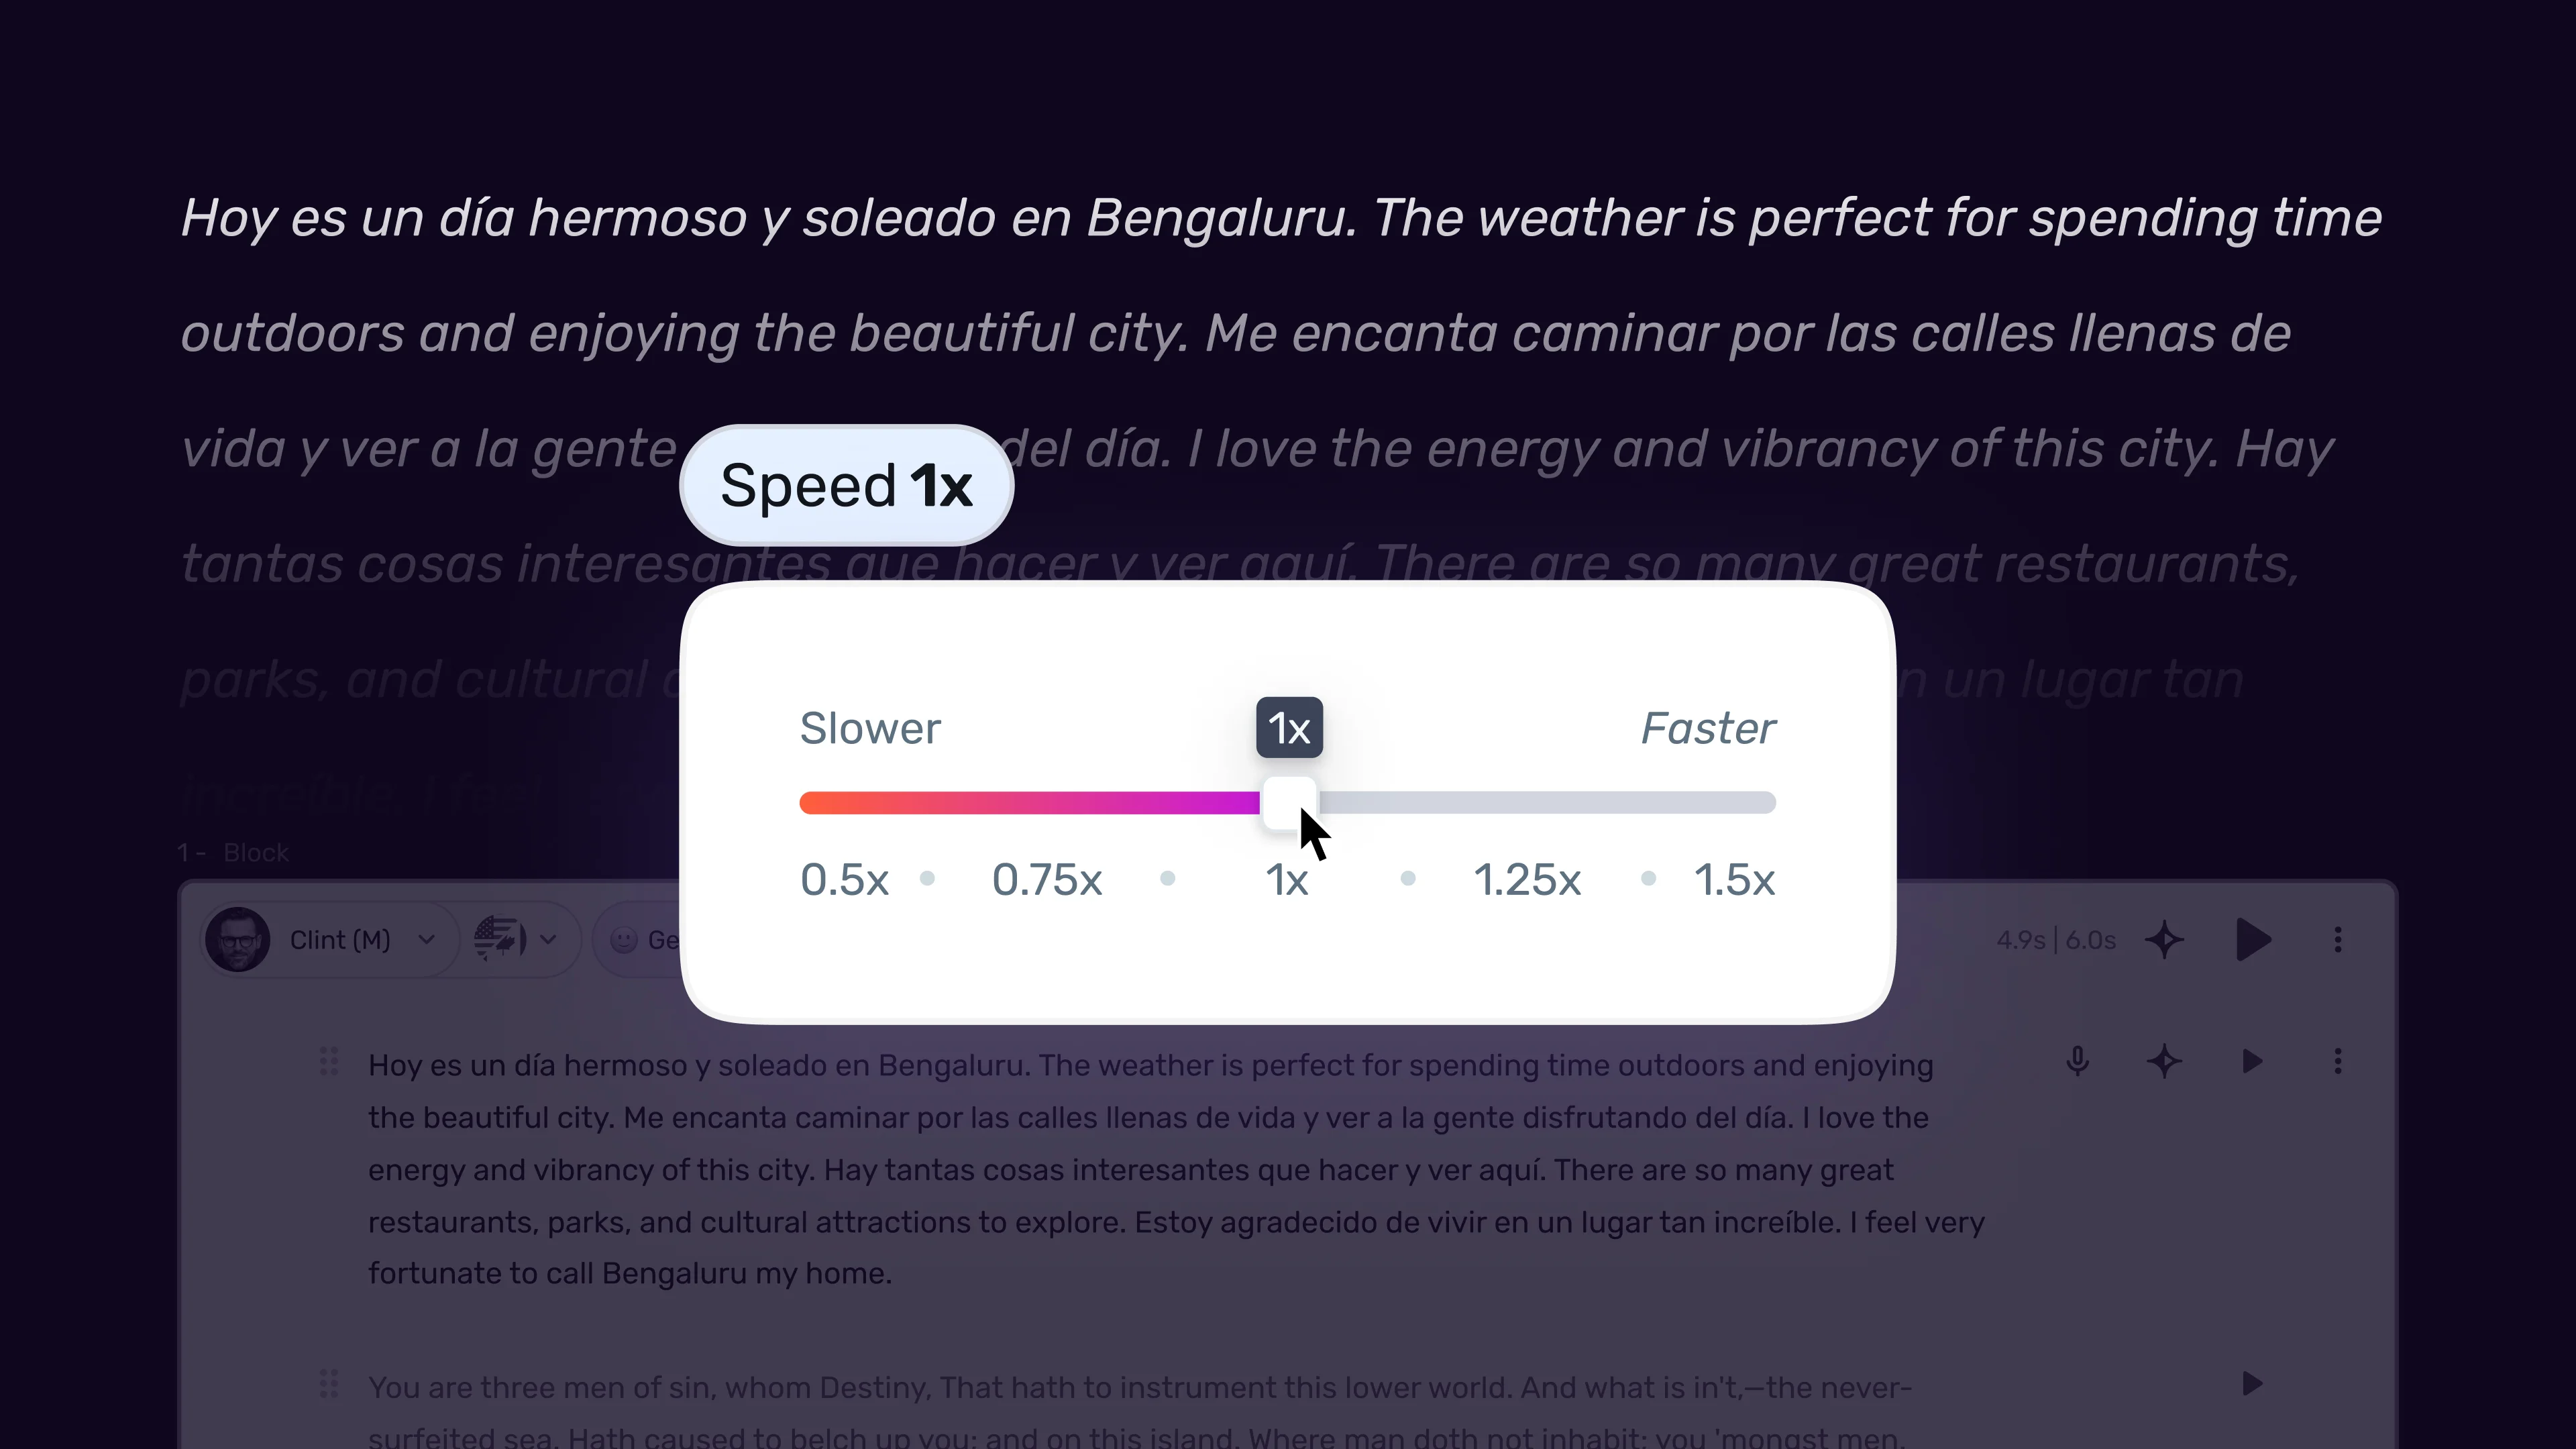
Pitch adjustment. The pitch slider raises or lowers the fundamental tone of the voice. Small adjustments (one or two increments in either direction) can make a voice sound slightly younger or more authoritative without making it sound artificial. Large pitch shifts sound unnatural, so use this control sparingly.
Pause controls. You can insert pauses between sentences or at specific points within a scene. Click between two sentences in the editor and use the pause control to add a short (0.5 second), medium (1 second), or long (2 second) pause. Pauses are critical for pacing - see our Murf pacing and pauses guide for the full set of timing rules. They give the listener time to absorb information and make the voiceover feel less rushed.
Emphasis. Select a word or phrase in the editor, then use the emphasis control in the voice panel to make the AI stress that word during generation. This is particularly useful for brand names, key terms, and calls to action. The AI does a reasonable job of inferring emphasis from context, but manually marking important words produces more consistent results - our Murf pronunciation and emphasis guide goes deeper on stress patterns.
Pronunciation overrides. If the AI mispronounces a technical term, acronym, or brand name, click on the word and use the pronunciation tool to enter a phonetic spelling or select from suggested alternatives. The official International Phonetic Alphabet reference is useful when you need exact phoneme spellings. Murf saves these overrides per project, so the correction applies every time that word appears.
Voice presets. Once you have dialed in the right combination of speed, pitch, and emphasis settings for a voice, save it as a preset. Click the save or bookmark icon in the voice panel. Presets carry across projects, which means you can maintain a consistent brand voice across dozens of voiceovers without reconfiguring settings each time.
The Timeline
The timeline at the bottom of the workspace gives you a visual, time-based view of your entire project. Navigate to it by scrolling down or clicking the timeline area.
Scene blocks. Each scene from the editor appears as a block on the timeline. The width of each block corresponds to its audio duration. After generating audio, you will see a waveform preview inside each block, which helps you visually identify sections with speech versus silence.
Playback controls. The play, pause, and stop buttons at the left of the timeline control playback for the entire project. The playback cursor (a vertical line) moves across the timeline as audio plays, showing your exact position. Click anywhere on the timeline to jump to that point.
Zooming. Use the zoom controls (plus and minus buttons or a slider) at the bottom-right of the timeline to zoom in for precise edits or zoom out to see the full project. When you are adjusting pauses between scenes or trimming silence, zoom in. When you are reviewing the overall flow, zoom out.
Scene reordering on the timeline. Drag scene blocks left or right to reorder them. Changing the order here automatically updates the editor, and vice versa. For projects with many scenes, the timeline is often more intuitive for reordering because you can see relative durations.
Multi-track layout. The timeline supports multiple tracks. Your voiceover audio occupies the primary track. Background music, if added, appears on a separate track below. Media elements (images or video) appear on their own track above the audio. This layered view lets you see how all elements align temporally.
Trimming and splitting. Click on a scene block and drag the edges to trim the beginning or end of the audio. This removes awkward pauses without regenerating. You can also split a scene block at the playback cursor position, creating two independent blocks from a single generation.
Gap management. The space between scene blocks on the timeline represents silence. You can drag blocks closer together to eliminate gaps or pull them apart to add breathing room. For narration projects, a 0.5 to 1 second gap between scenes sounds natural. For training content, longer gaps of 1 to 2 seconds help learners process information.
The Media Library
The media library is not visible by default. Navigate to it by clicking the media or library icon in the toolbar - typically represented by a music note or film strip icon.
Background music. Murf includes a collection of royalty-free background music tracks organized by mood, genre, and energy level. Browse categories like Ambient, Corporate, Upbeat, or Cinematic. Click the play icon to preview a track before adding it. When you find the right track, click “Add to Project” and it appears on the music track in the timeline. For longer projects you may also want to source extra tracks from libraries like the YouTube Audio Library.
Music volume and ducking. After adding background music, adjust its volume using the slider on the music track. Murf supports auto-ducking, which automatically lowers music volume during voiceover and raises it during pauses. Set the music to about 15 to 20 percent of the voiceover level for a professional balance.
Images. You can add images to your project that display during specific scenes. Click the image tab in the media library to upload your own images or browse stock options. Drag an image onto the media track in the timeline and position it to align with the relevant scene. This feature is primarily useful if you are exporting a video file rather than audio-only.
Video import. On paid plans, you can import video files into the timeline and align your voiceover to existing footage. Import a video file through the media library, and it appears on the video track. Write scenes that match the video content and generate voiceover that plays alongside the footage.
Upload limits. The free tier has limited media upload capacity. Paid plans expand this significantly. Check your plan’s limits on the Murf pricing page if you are working with large media files.
Settings and Export
The export process is straightforward once you know where the options are. Navigate to the export panel by clicking the “Export” button in the top-right corner of the workspace.
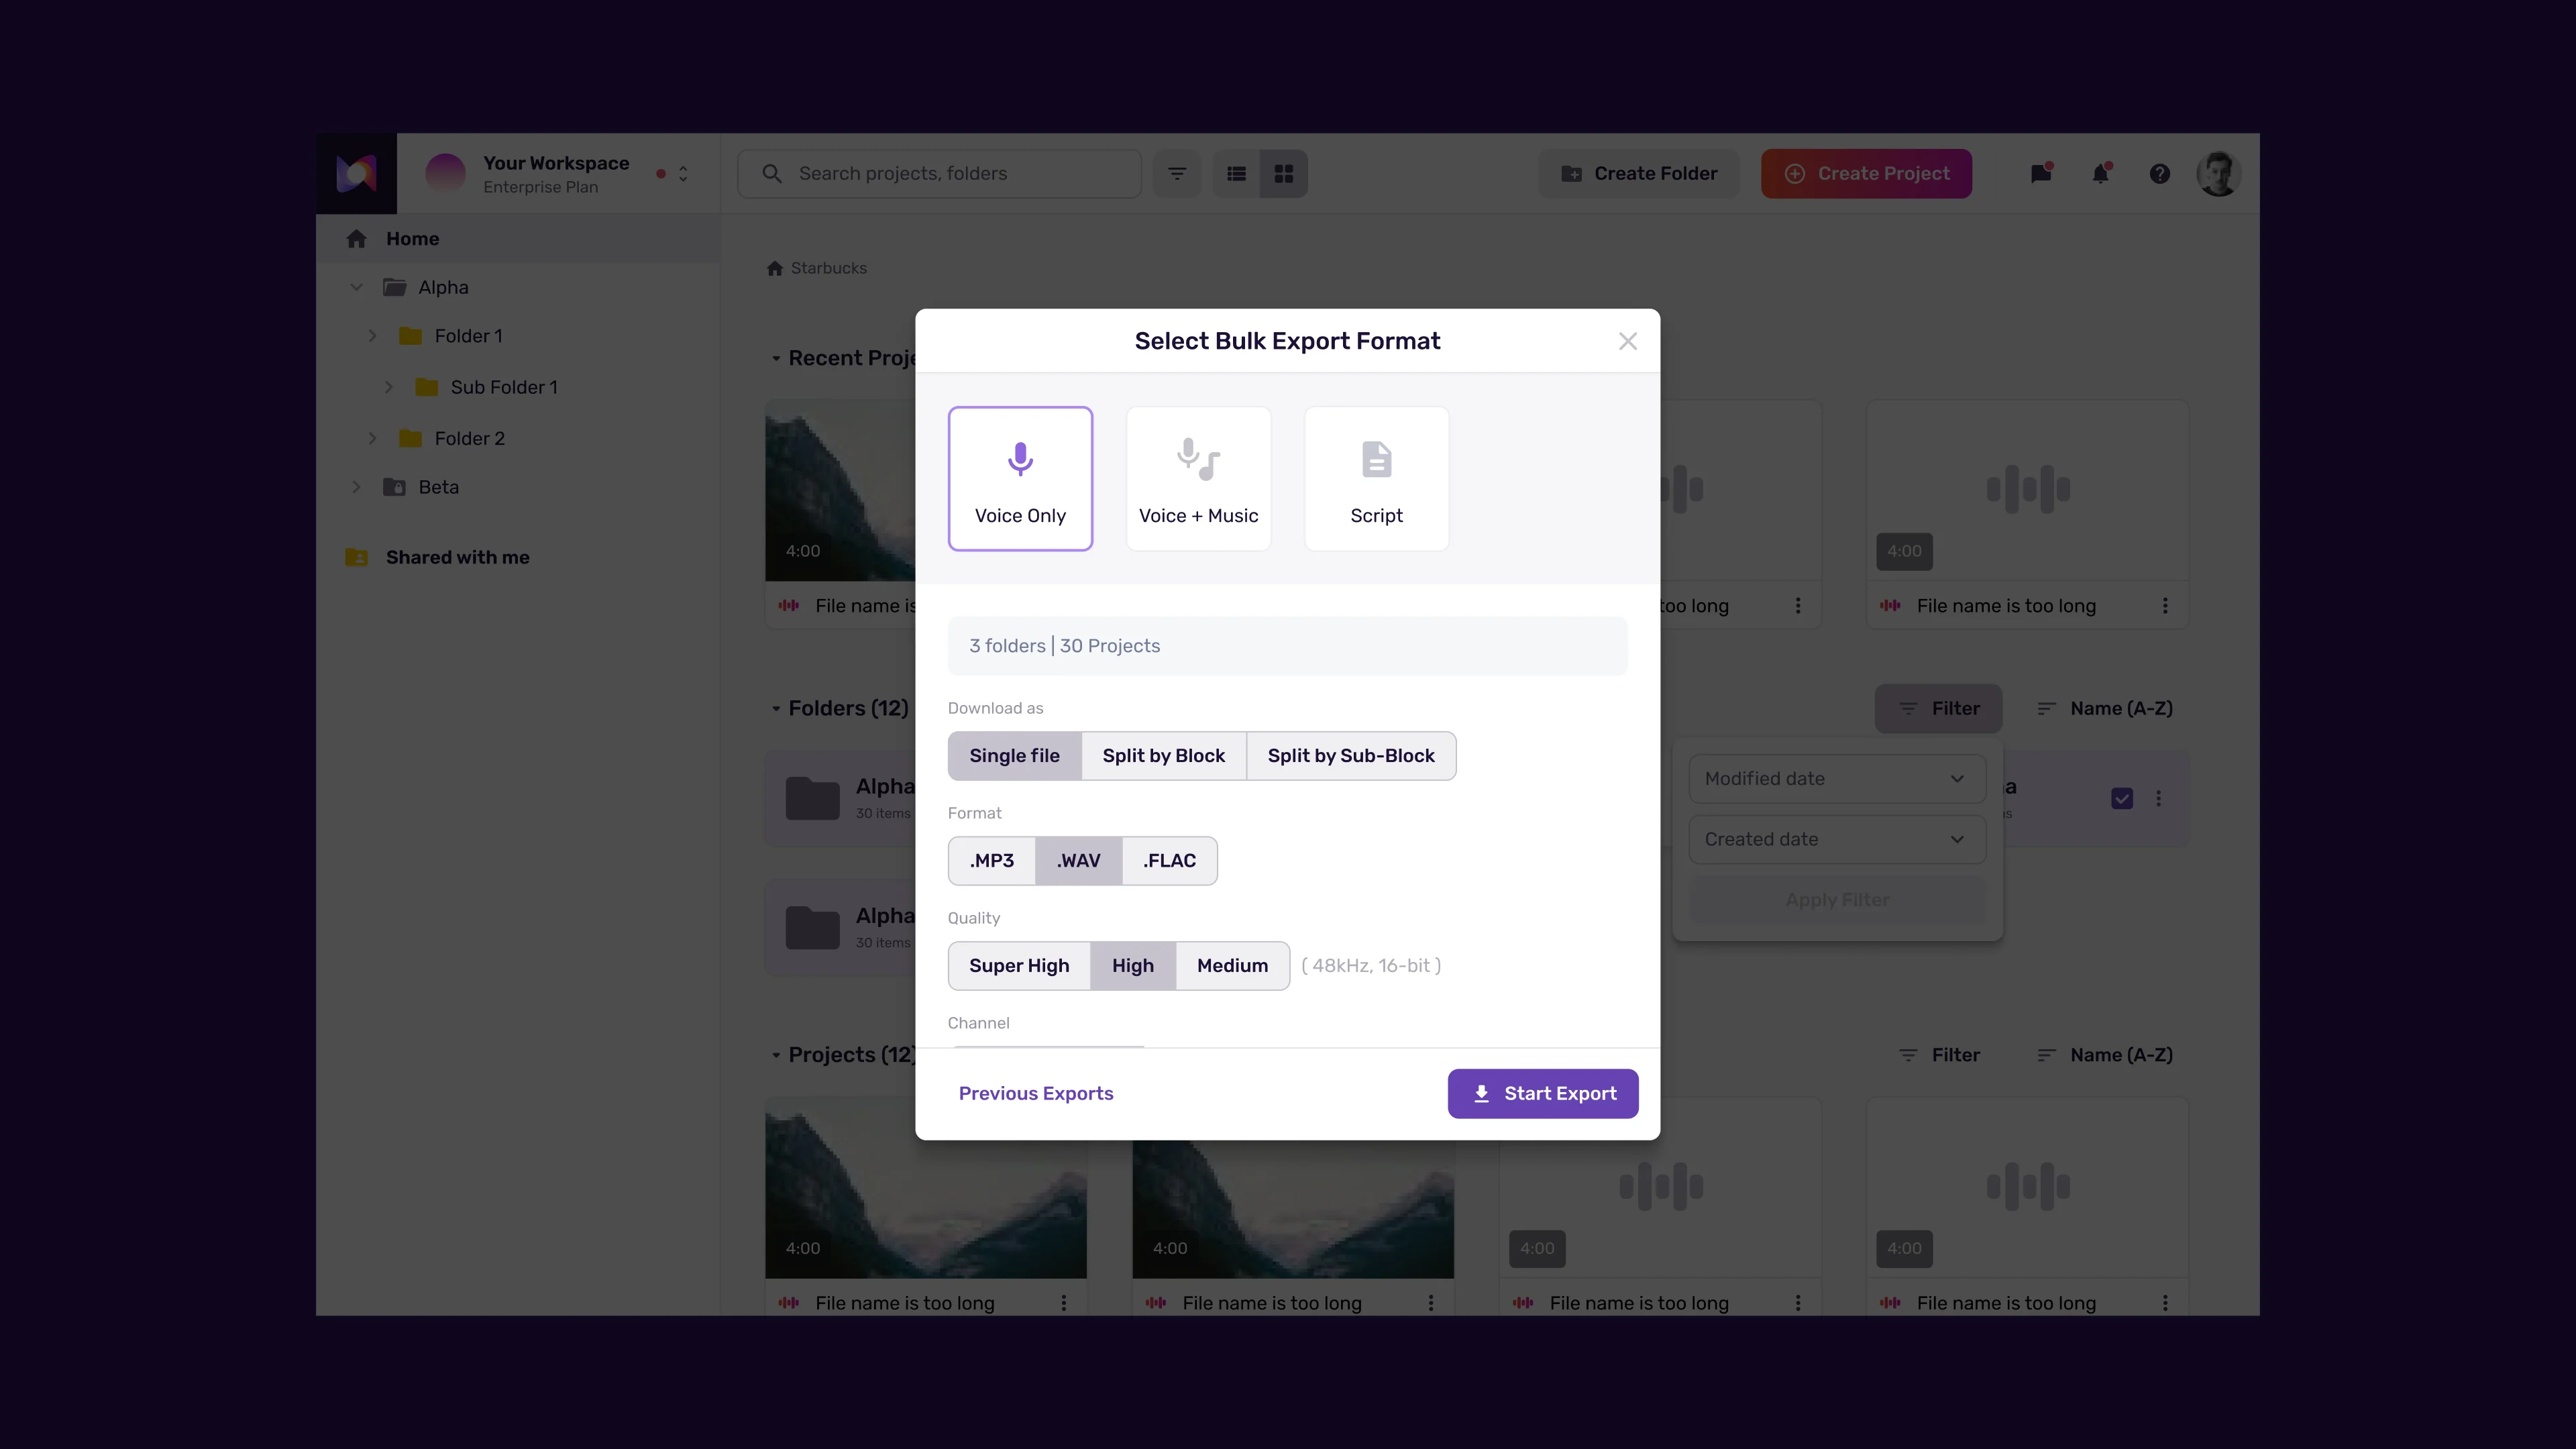
Audio format. Choose between MP3, WAV, and FLAC. MP3 files are smaller and work for most delivery scenarios - podcasts, video voiceovers, and web content. WAV files are uncompressed but preserve full audio quality for post-production editing. FLAC offers lossless compression as a middle ground - the FLAC project documentation covers the format trade-offs in depth. If you plan to edit the audio further after exporting, choose WAV. The Murf export formats and quality guide covers each option in more detail.
Video export. If your project includes images or imported video, you can export as a video file (MP4). The video export combines your voiceover, background music, and visual elements into a single file. This is useful for creating quick explainer videos, social media content, or training modules without opening a separate video editor.
Quality settings. The export panel offers quality presets like Standard, High, or Custom. For professional deliverables, always select the highest available quality. The file size difference is minimal for voiceover content.
Scene-by-scene export. If you need individual audio files for each scene, look for the “Export Scenes Separately” option. This is valuable when feeding individual clips into a video editor where you need granular control over timing.
Project settings. The project settings menu (accessible from the top bar or a gear icon) lets you configure defaults for new scenes - default voice, pause duration between scenes, and sample rate. These apply to new scenes only and do not retroactively change existing ones.
Sharing and collaboration settings. On the Business plan, project settings include access controls for team members. Navigate to share settings to manage who can edit, view, or comment. You can also generate a public share link for external stakeholders who need to review without logging into Murf. For agencies running multi-editor projects, the Murf team collaboration guide covers role assignments and review workflows.
Pro Tips for the Murf Studio Workspace
These tips come from working with the studio editor across multiple projects and catching the efficiency shortcuts that the interface does not make obvious.
Use keyboard shortcuts. Press Space to play and pause. Press Ctrl+Z to undo and Ctrl+Shift+Z to redo. These shortcuts save significant time when iterating on voice settings and regenerating scenes - the Murf script writing tips guide covers shortcuts for splitting blocks too.
Generate scenes individually first. When starting a new project, generate one scene at a time and review it before moving on. This catches voice selection issues, pronunciation problems, and pacing concerns early. Once you are satisfied with the settings, then use “Generate All” to process the remaining scenes in batch.
Name your scenes. If the editor supports scene labels or notes, use them. For a 15-scene training module, labels like “Introduction,” “Step 1: Account Setup,” and “Conclusion” make navigation far easier than scrolling through unlabeled blocks of text.
Split long paragraphs into multiple scenes. The AI generates more natural-sounding audio when each scene contains 2 to 4 sentences rather than a wall of text. Shorter scenes also give you finer control over pacing on the timeline, because you can adjust gaps between smaller blocks more precisely.
Preview with headphones. Always review generated audio through headphones before exporting. Laptop speakers mask subtle artifacts like pronunciation glitches and volume inconsistencies that become obvious on headphones.
Save voice presets early. As soon as you find a voice and speed combination that works for your project, save it as a preset. This prevents the frustrating situation where you spend 10 minutes recreating settings you dialed in yesterday but did not save. The Murf variability and natural-sounding voice tips guide explains which preset fields matter most.
Use the timeline for final polish. After generating all scenes, switch to the timeline for a final pass. Listen to the full project with background music enabled, check that transitions are smooth, and verify that overall pacing feels natural.
Keep your script concise. The studio workspace performs best with scripts that use short, direct sentences. Sentences under 25 words produce more natural voiceover output than long, complex sentences with multiple clauses. If your source material is dense, rewrite it for spoken delivery before pasting it into the editor.
Who Murf Studio is not for. Murf is built around synthesised voices and a block-based editor; if your workflow depends on cloning a specific person’s voice from short reference audio, ElevenLabs handles that better today. Skip Murf if you need on-device offline TTS or sub-50ms streaming latency without an Enterprise contract - those use cases sit outside the Studio product. The Studio also rewards scripted narration over freeform improvisation, so live podcasters editing in real time will find a traditional DAW more comfortable.
Frequently Asked Questions
Can I use different voices for different scenes in the same project?
Yes. Each scene can have its own voice assignment. Select a scene in the editor, then use the voice panel on the right to choose a different voice. This is useful for dialogue-style content, multilingual projects, or situations where different sections need different vocal tones.
How do I fix pronunciation errors in the generated audio?
Click on the mispronounced word in the editor, then use the pronunciation override tool in the voice panel. Enter a phonetic spelling or choose from suggested alternatives. The override saves per project, so every instance of that word uses your correction. Set up overrides before generating to avoid repeated regeneration.
What is the difference between generating scenes individually and using Generate All?
Generating individually processes one scene at a time and lets you review the output before moving on. Generate All processes every scene at once, which is faster when you have finalized your voice settings. The audio quality is identical either way. Use individual generation during drafting and batch generation for final production.
Does background music count against my monthly generation limits?
No. Background music from the Murf media library does not consume your voice generation minutes. Only text-to-speech conversion counts against your plan’s limits. You can add, remove, and swap music tracks freely. However, uploading your own media files may count against storage limits depending on your plan.
Can I collaborate with team members in real time?
Real-time collaboration is available on the Business plan ($99 per month). Editors can modify scripts, change voice settings, and adjust the timeline. Viewers can play back and leave comments. For marketing agencies, e-learning departments, or content teams, collaboration eliminates the bottleneck of exporting audio, collecting feedback by email, and reimporting changes. The Murf eLearning narration guide digs into review workflows for course teams specifically.
How do I export just the audio without background music?
Mute the background music track on the timeline by clicking the volume or mute icon, then export as usual. The exported file will contain only the voiceover audio. If you want both versions, export once with music enabled and once with it muted. For YouTube production specifically, the Murf YouTube voiceover workflow covers stem-based mixing in your video editor instead.
Want to learn more about Murf AI?
Related Guides
- Murf AI Getting Started: Beginner Guide
- Murf AI Text To Speech Tutorial
- Murf AI Voice Selection Tips
- Murf AI Pronunciation Control and Emphasis
- Murf AI Export Settings: Formats and Quality Guide
Related Reading
- Murf AI Tool Page - Full review with pricing, ratings, and feature breakdown
- Best AI Voice Generators 2026 - How Murf compares to ElevenLabs, LOVO, WellSaid Labs, and others
- AI Voiceover Tips for Professional Audio Content
External Resources
- Murf AI Help Center - Official Studio documentation, troubleshooting, and tutorials
- Murf AI Blog - Product updates, voice releases, and use-case write-ups from the Murf team
- Wikipedia: Speech Synthesis - Background on TTS architectures and the Speech Gen 2 family of models
Related Guides
- AI Video Creation Tips: 2026 Walkthrough for Teams
- AI Voice Cloning Ethics Best Practices: Complete 2026 Guide
- AI Voiceover Corporate Training With WellSaid Labs
- AI Voiceover for YouTube Videos: Murf Workflow Guide 2026
- AI Voiceover Tips: Making Synthetic Voices Sound Human
- ElevenLabs API Setup: Developer Quick Start Guide (2026)
- ElevenLabs Audio Native Embed Audio on Any Website
- ElevenLabs Audio Quality Settings: Pro Tips and Settings
- ElevenLabs Audiobook Creation: Long-Form Audiobook
- ElevenLabs Conversational AI Agents: Build Voice Agents