
Most YouTube creators avoid voiceover entirely because hiring a professional voice actor is expensive and recording your own voice is uncomfortable. The result is either silent B-roll montages or shaky self-recorded narration with background noise and pacing problems. Murf AI eliminates both problems and ranks among the best AI voiceover for youtube videos options available today. You write the script, select a voice that fits your channel’s tone, and generate studio-quality text-to-speech audio in minutes - no microphone required. For broader context on the free AI voice generator landscape and paid alternatives, see our best AI voice generators 2026 roundup.
This guide walks through the complete ai voiceover for youtube videos workflow using Murf AI. From writing a script that works well with text-to-speech engines, through voice selection and fine-tuning, to exporting audio that meets YouTube’s quality expectations, every step is covered in sequence. If you have a Murf account and a video idea ready, you can have your first voiced video ready to upload within 25 minutes of finishing this guide. New to Murf entirely? The Murf getting started guide covers signup and your first project.
Why AI Voiceover for YouTube Videos Works
YouTube is an audio-first platform. A viewer will tolerate mediocre visuals far longer than they will tolerate poor audio - YouTube’s own creator guidance consistently flags audio quality as the top retention factor in the first 30 seconds. For creators who are not comfortable on camera or who want to publish consistently without recording sessions, AI voiceover is not a compromise - it is a production upgrade.
Murf AI specifically suits YouTube production for several reasons. The platform offers 200+ voices across 35 languages, covering every channel niche from educational narration to high-energy gaming commentary. The Studio editor - covered in detail in our Murf studio workspace walkthrough - displays your script as readable blocks alongside a waveform preview, so you can catch pacing problems before final generation. And the export settings are optimized for video integration, producing clean audio files that sync naturally with your editing timeline.
The workflow covered here is linear by design. Each step builds on the previous one, and skipping steps - particularly the script formatting step - produces noticeably worse results. Follow the sequence the first time, then adapt it to your specific channel style as you build familiarity with the platform. For a broader look at how AI voiceover for youtube videos online compares to hiring human voice actors or recording your own voice, see our best AI voice generators 2026 roundup.
Prerequisites
Before starting this workflow, confirm you have the following in place:
-
A Murf AI account - A free trial account provides enough generation credits to complete this guide. The Creator plan or Business plan unlocks the full voice library and commercial usage rights for ongoing production. Check current Murf pricing for tier details.
-
A script or video concept - You do not need a finished script before opening Murf, but you should have a clear topic and rough outline. The Murf script writing tips guide covers prep that pays off downstream.
-
A video project (optional but recommended) - Having your video footage, screen recordings, or slide deck ready lets you test the voiceover against visuals during the fine-tuning step.
-
A video editor - Any standard editor (DaVinci Resolve, Premiere Pro, CapCut, iMovie) works for importing the exported audio file.
You do not need a microphone, recording setup, or prior voiceover experience. The workflow is designed for creators who are new to AI voice generation.
What Are the Stages of the Murf YouTube Voiceover Workflow?
The complete YouTube voiceover workflow in Murf AI runs through five stages:
- Write and format your script for AI delivery
- Set up your project in Murf Studio
- Select and audition your voice
- Generate and fine-tune the voiceover - speed, pauses, and emphasis
- Export the audio for YouTube
Each stage takes between two and eight minutes. The total time of 25 minutes assumes you have a script topic ready. If you are writing from scratch, add another 10 to 15 minutes for the scripting phase.
Step 1: Write and Format Your Script
The quality of your Murf voiceover depends more on your script than on any platform setting. Text-to-speech engines are excellent at reading well-formatted prose and noticeably poor at handling ambiguous punctuation, unconventional formatting, or overly complex sentence structures. A few formatting rules eliminate the most common generation problems before they happen.
Write conversationally, not formally. Murf’s voices are trained on natural speech patterns. Short sentences, active voice, and direct language produce smoother output than academic or corporate writing. Read your script aloud before pasting it into Murf - if you stumble while reading it, the AI will stumble too. The U.S. plain language guidelines are a useful sanity-check for spoken-word writing.
Use full words instead of abbreviations. Write “three minutes” instead of “3 min”, “for example” instead of “e.g.”, and “United States” instead of “US” on first mention. Abbreviations are inconsistently handled by TTS engines, and the mispronunciation of a common abbreviation breaks the listener’s trust immediately.
Control sentence length deliberately. Sentences between 10 and 20 words produce the most natural delivery. Very short sentences (under 5 words) create choppy, staccato rhythm. Very long sentences (over 30 words) often lose natural phrasing and breathiness in the middle. When editing your script, flag any sentence over 25 words and split it.
Format list content as separate lines. If your video covers “five reasons to use a standing desk”, write each reason as its own paragraph block rather than a single paragraph with five comma-separated clauses. Murf generates a natural pause between blocks, which gives viewers time to process each point.
Mark any unusual terms phonetically. Proper nouns, product names, and technical terms that look strange on the page often get mispronounced. You can address these in Step 4 using Murf’s pronunciation editor - the Murf pronunciation and emphasis guide covers the override tools - but flagging them in your script now makes the fine-tuning step faster. The IPA reference is useful when you need exact phoneme spellings.
Script length guide for YouTube formats:
| Video Length | Target Script Length | Approximate Words |
|---|---|---|
| 3 - 5 min | Short-form explainer | 450 - 750 words |
| 7 - 10 min | Standard tutorial | 1050 - 1500 words |
| 12 - 15 min | In-depth guide | 1800 - 2250 words |
| 20+ min | Long-form course | 3000+ words |
Once your script is formatted and ready, copy it to your clipboard. You will paste it directly into Murf Studio in the next step.
Step 2: Set Up Your Project in Murf Studio
Log into your Murf AI account and navigate to the Studio editor. This is where you will build and manage your voiceover project.
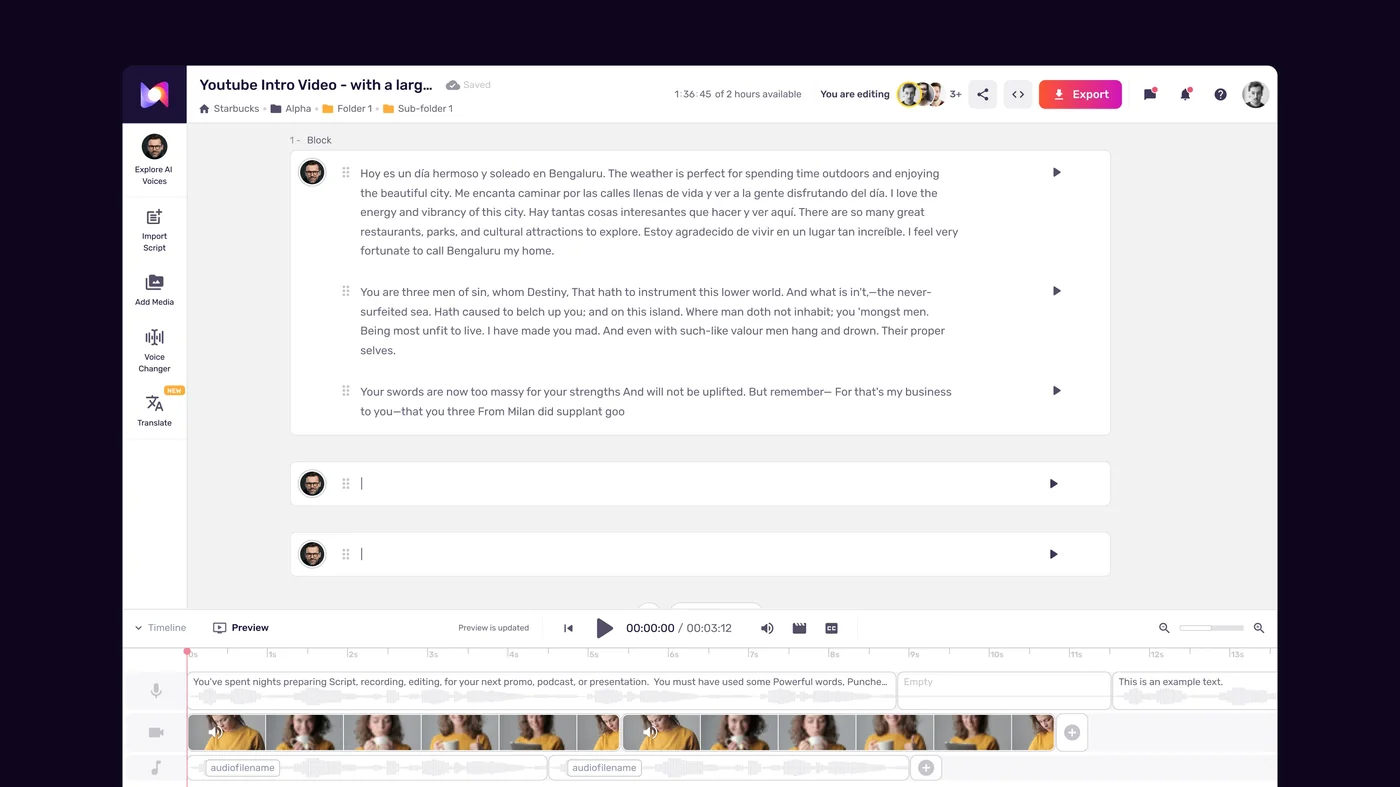
Create a new project:
- Click “Create New Project” from the dashboard
- Select “Voiceover” as the project type
- Name the project with your video title for easy reference - something like “YouTube - [Video Title] - [Date]” keeps your project library organized as it grows
- Choose your primary language from the dropdown - English (US) covers the largest YouTube audience if you are producing in English
Paste and organize your script:
- Click into the script editor area in the center of the Studio workspace
- Paste your formatted script using Ctrl+V (or Cmd+V on Mac)
- Murf automatically divides your pasted text into blocks - typically one block per paragraph
- Review the block divisions and manually split any blocks that contain more than two to three sentences. Shorter blocks give you more fine-tuning control in Steps 3 and 4
Set your project settings:
- Select your output audio quality - use “High Quality” (WAV or high bitrate MP3) for YouTube production. Standard quality is sufficient for draft review but not for final export
- Confirm the project language matches your script language
- If your video will use multiple speakers or have separate narrator segments, check the multi-voice option now rather than discovering it mid-project
The Studio workspace at this stage shows your script divided into blocks on the left and an empty voice panel on the right. The next step fills that voice panel with the right voice for your channel.
Step 3: Select Your Voice
Murf AI provides 200+ voices, which makes selection feel overwhelming without a process. The goal is not to find the “best” voice in the library - it is to find the voice that best matches your channel’s tone and your audience’s expectations. For a deeper framework, the Murf voice selection tips guide walks through structured shortlisting.
Start with voice filters:
- Open the voice browser from the right panel in Studio
- Filter by language first (English US, English UK, Australian English, etc. depending on your audience)
- Apply an accent filter if your content has a regional focus
- Filter by use case - “YouTube & Podcasts” narrows the library to voices specifically tuned for online content delivery
Audition voices systematically:
- Copy one mid-script paragraph - not the opening line, which is often atypical, but something representative of your main content
- Paste this test sentence into the voice preview input
- Click the play button on each candidate voice to hear it deliver your actual words
- Shortlist three to five voices that feel right before making a final decision
Voice characteristics to match to content type:
- Educational/tutorial channels - Voices tagged as “professional” or “informative” with a measured delivery pace. Avoid voices labeled as “energetic” for long-form educational content - they become fatiguing over 10+ minutes. The Murf eLearning narration guide covers fatigue-resistant voice selection in depth.
- Entertainment/commentary channels - Voices with higher natural expressiveness and slight upward inflection. Test voices tagged “conversational” or “expressive”.
- Finance/business channels - Authoritative voices with clean delivery and minimal vocal fry. Look for “corporate” or “business” tags.
- Gaming/tech channels - Voices with energy and natural pitch variation. “Dynamic” and “youthful” tagged voices often suit gaming content well.
Apply the selected voice:
- Click “Apply to Project” on your chosen voice
- This applies it across all script blocks - you can assign different voices to specific blocks later if your video has segments with different speakers
- Generate a preview of the first two to three blocks to confirm the voice works across more than just your test sentence
Voice selection is reversible at any point in the project. If after generating the full voiceover in Step 4 the voice does not feel right, you can switch and regenerate without rewriting your script.
Step 4: Generate and Fine-Tune Your Voiceover
With your script structured and your voice selected, generate the initial voiceover. Click “Generate All” to produce audio for every script block simultaneously. For a 1000-word script, generation typically takes 30 to 90 seconds.
After generation, your first task is listening to the entire output from start to finish before making any changes. Resist the urge to stop and fix problems as you hear them - listen through completely first to identify patterns. Isolated issues (one mispronounced word, one awkward pause) are fixed quickly. Systemic issues (the voice is too slow throughout, the emotion is too flat for the content) require adjustments at the project level rather than block by block.
Adjusting voice speed for YouTube pacing:
YouTube audiences are accustomed to faster delivery than traditional broadcast media. Most AI voices at default 1.0x speed feel slightly slow for online video. For most YouTube formats, a baseline of 1.1x to 1.2x produces more natural pacing - the Murf pacing, pauses, and speed tips guide covers the rhythm rules for different content types.
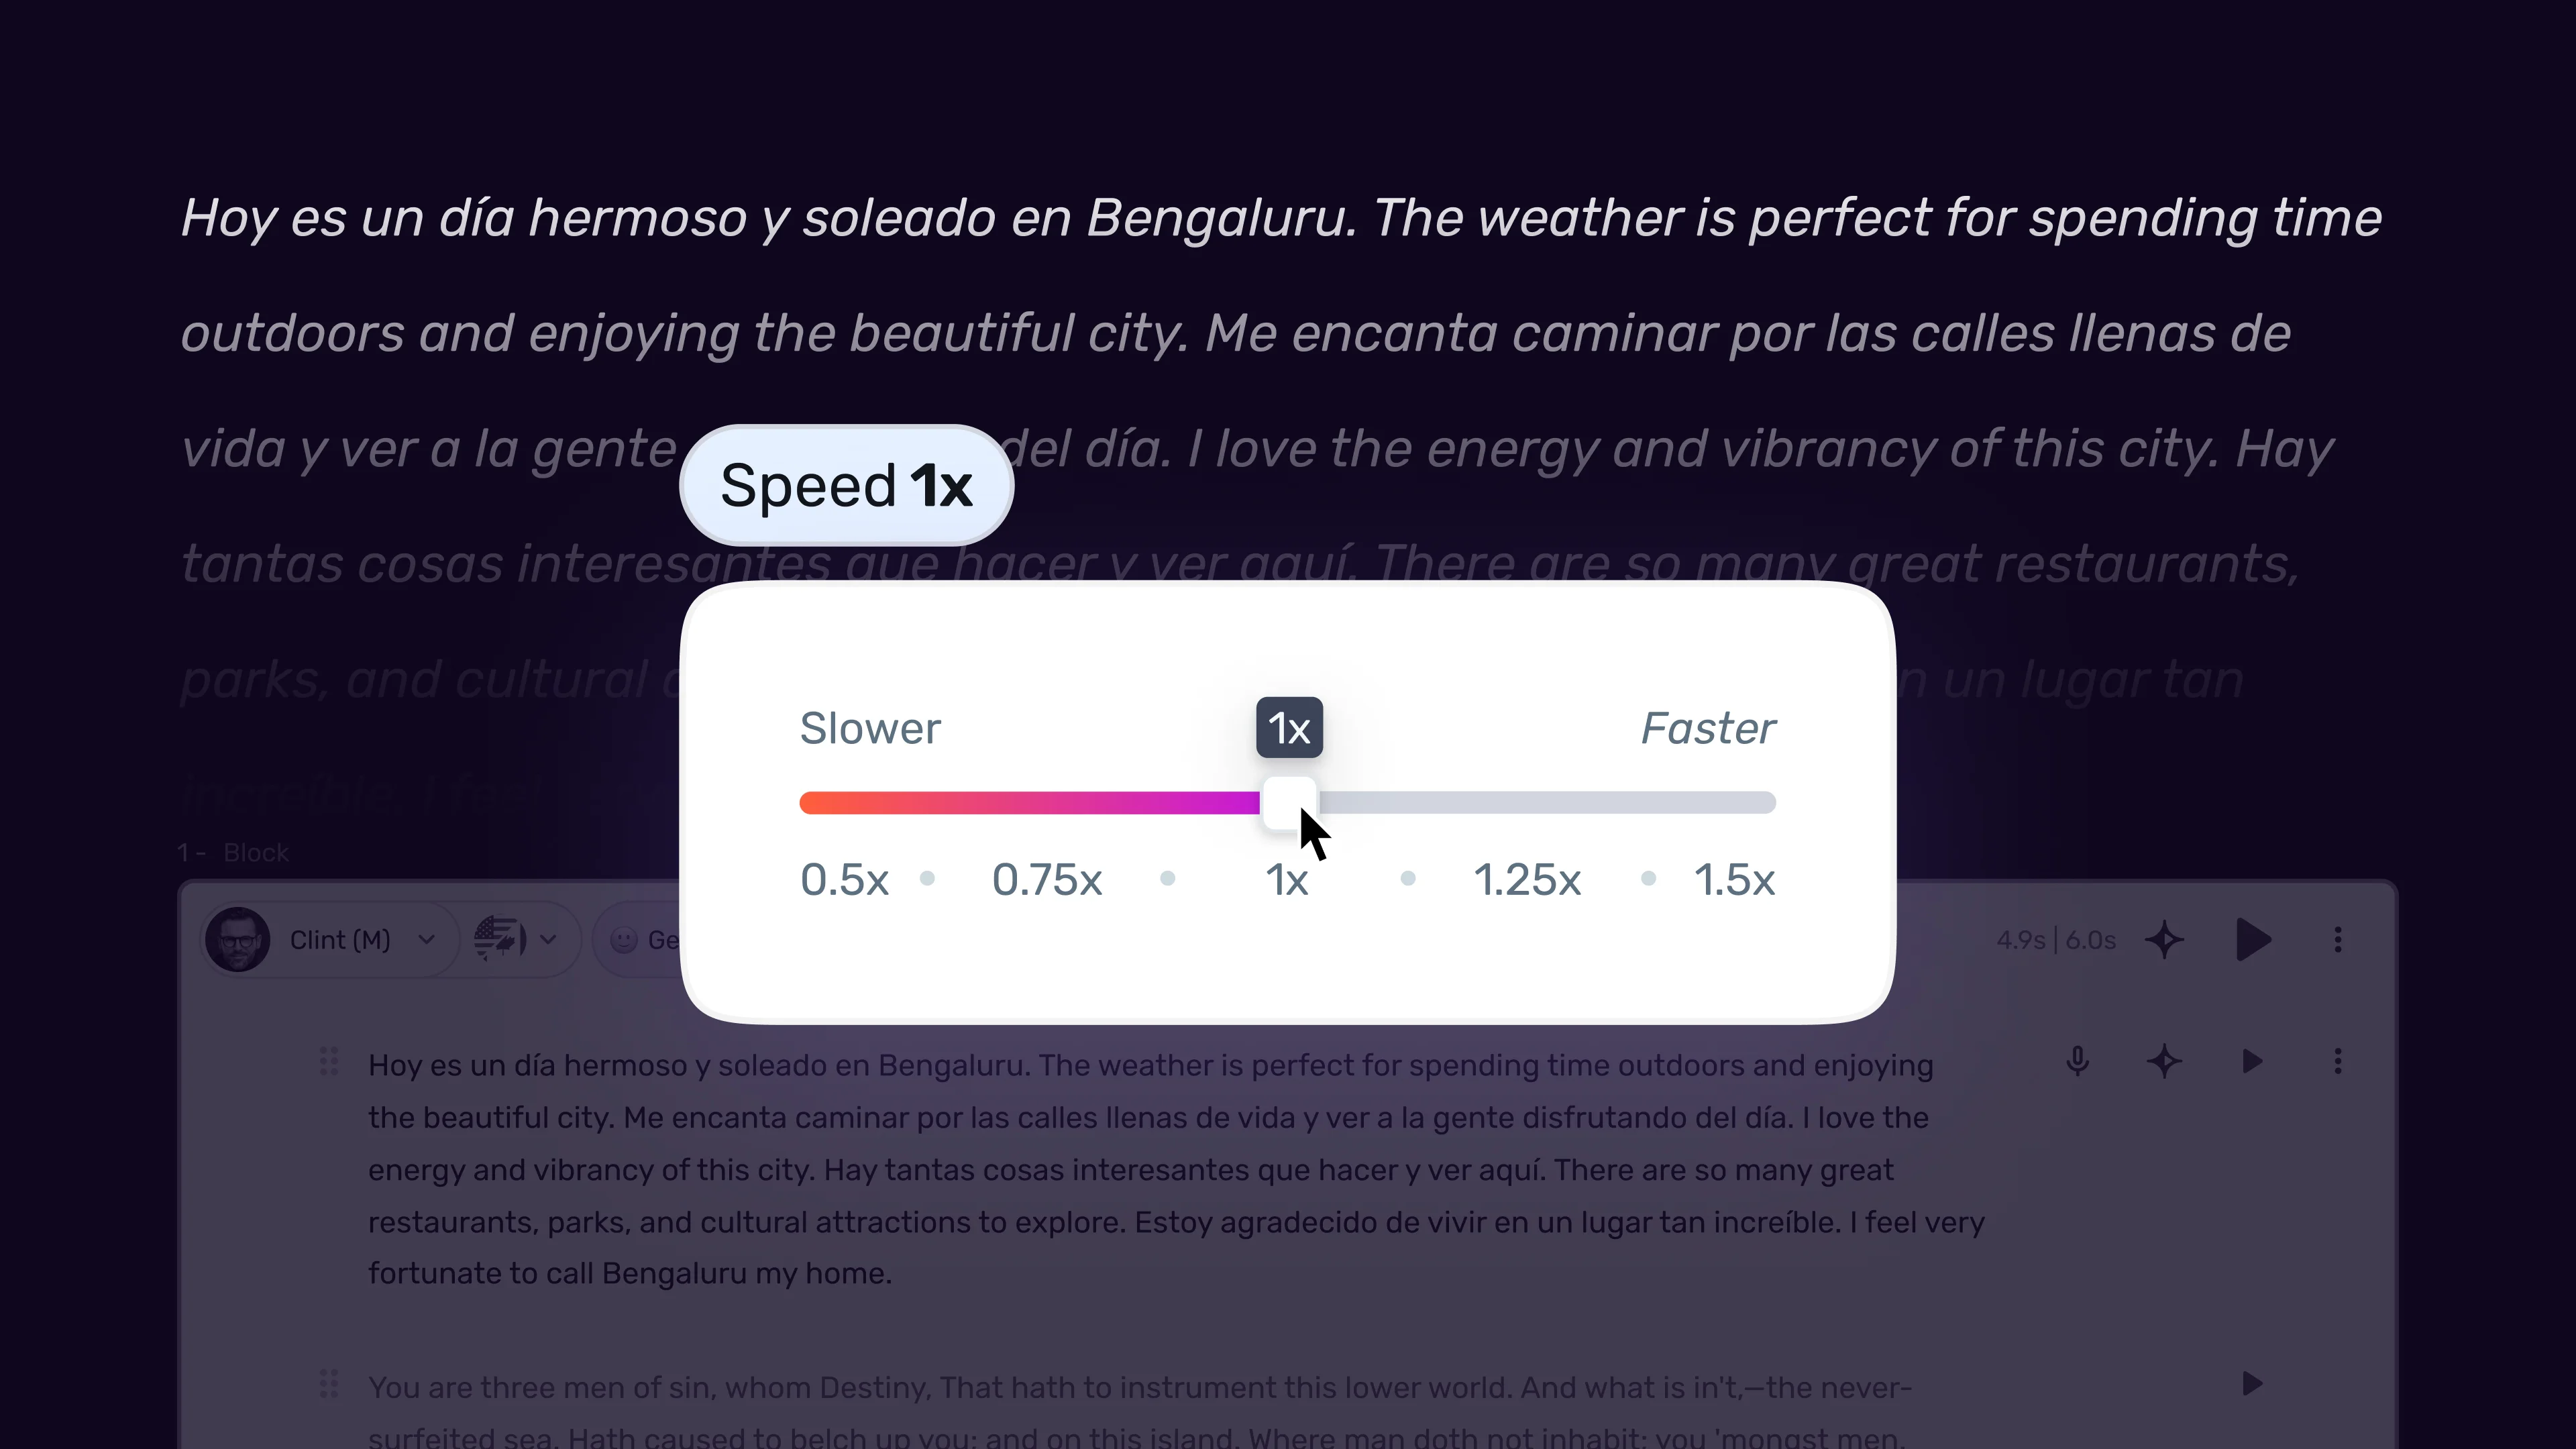
- Select all script blocks (Ctrl+A or use the select-all option in the block panel)
- Move the speed slider to 1.1x as your baseline
- Regenerate the project to hear the adjusted speed
- Identify any blocks that feel rushed at 1.1x - typically blocks with dense technical information or complex sentence structure - and drop those individual blocks back to 1.0x or 0.95x
- For high-energy intro and outro sections, consider 1.2x to 1.3x to match the higher energy typically used in those segments
Adding pauses for natural rhythm:
The single most impactful fine-tuning action for YouTube voiceover is adding strategic pauses at transition points. The default AI output does not add pauses between topic changes, and the result is a voiceover that sounds like a single unbroken stream of words. Natural narration pauses when the topic shifts. The Murf studio workspace walkthrough shows where the pause controls live in the editor.
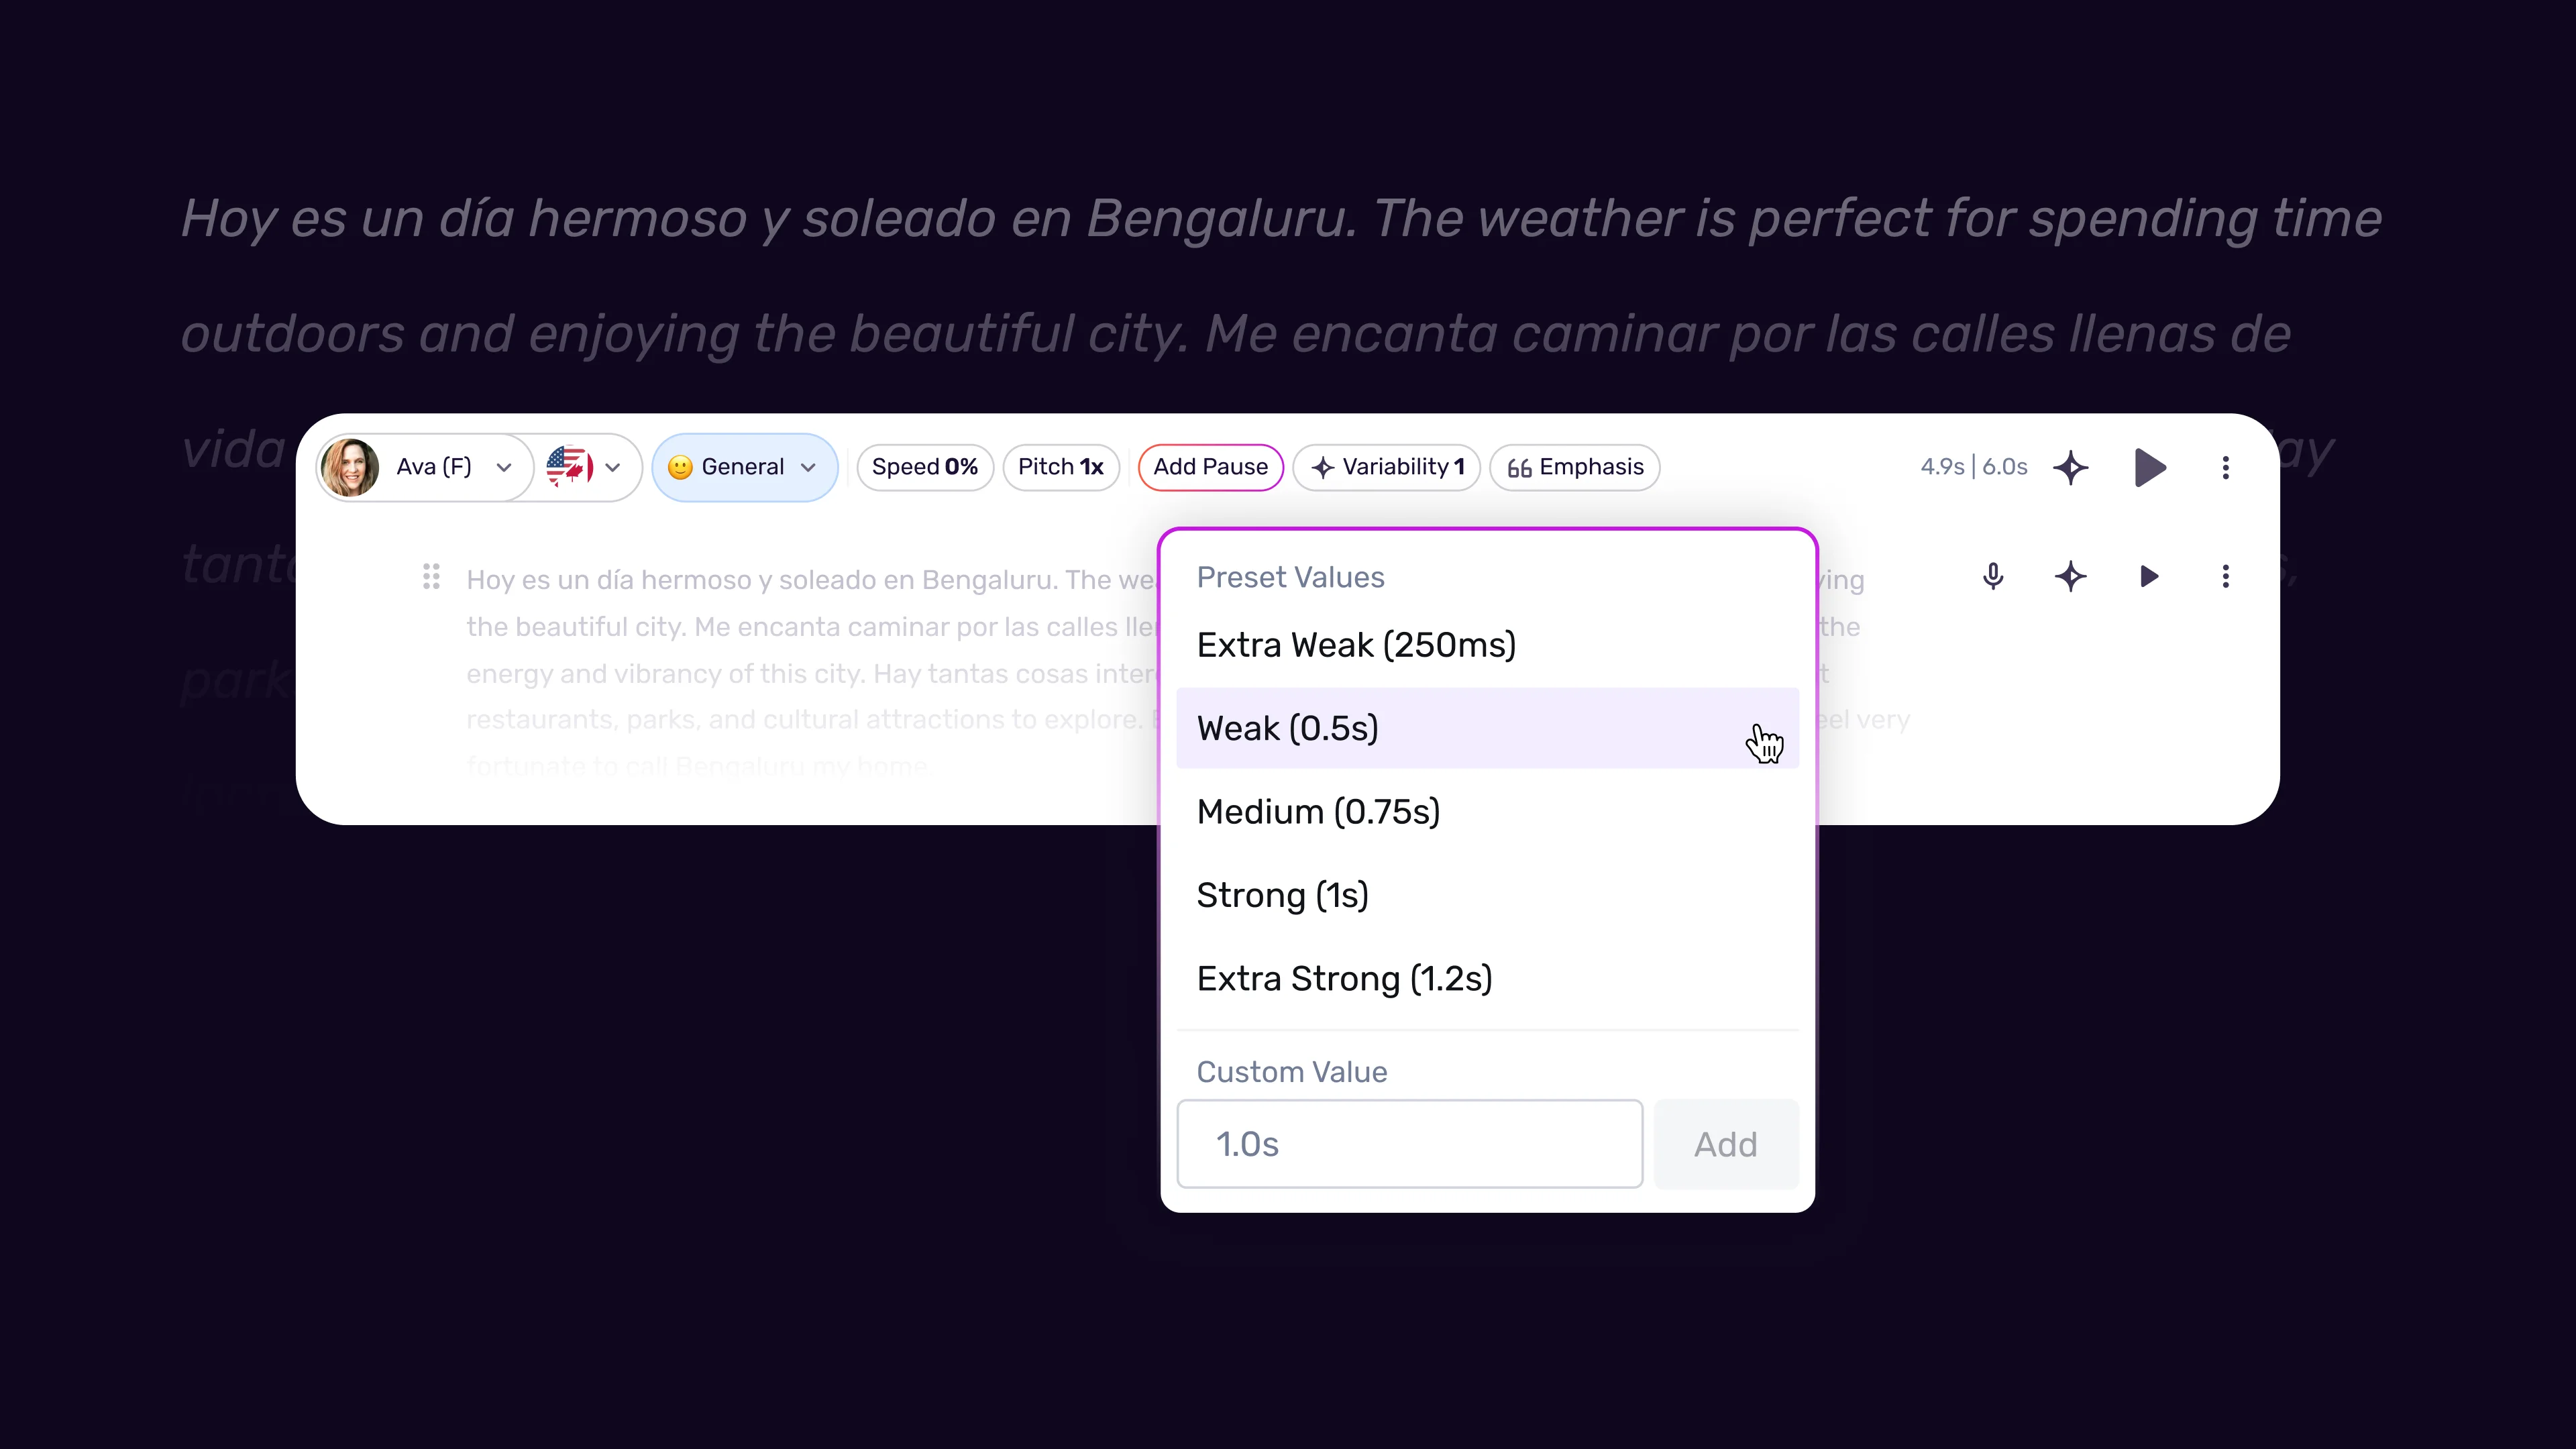
- Place your cursor at the end of a section-ending block - typically the last sentence before a new subtopic begins
- Open the pause insertion tool from the toolbar
- Insert a 600ms to 800ms pause at each major section transition
- Insert 300ms to 400ms pauses between key points within a section (e.g., between numbered list items)
- Insert a 500ms pause before your call-to-action at the end of the video - the brief silence signals that something important is coming
Adding emphasis to key phrases:
For words or phrases you want the AI to stress, select the specific text within a block and use the emphasis control to increase stress weight. Use this sparingly - one to two emphasis markers per paragraph maximum. Over-emphasized scripts sound like a salesperson reading a bullet list. For storytelling-heavy channels, the Murf emotion control guide covers when emotion sliders beat raw emphasis.
Fixing mispronunciations:
- When you hear a mispronounced word, select that word in the script block
- Open the pronunciation editor
- Type the phonetic spelling or use the built-in phoneme editor to specify exactly how the word should sound
- Common issues: product names, acronyms, and names with non-standard spellings
Preview before final generation:
After making all adjustments, do a complete preview playback at the project level. This is distinct from the individual block previews you used during fine-tuning. The full project preview reveals pacing issues that only become apparent across consecutive blocks - a speed adjustment in one block that creates a jarring transition with the next, or a pause that is too long relative to the surrounding content.
Step 5: Export for YouTube
When you are satisfied with the complete voiceover, export the audio in a format optimized for your video editing workflow.
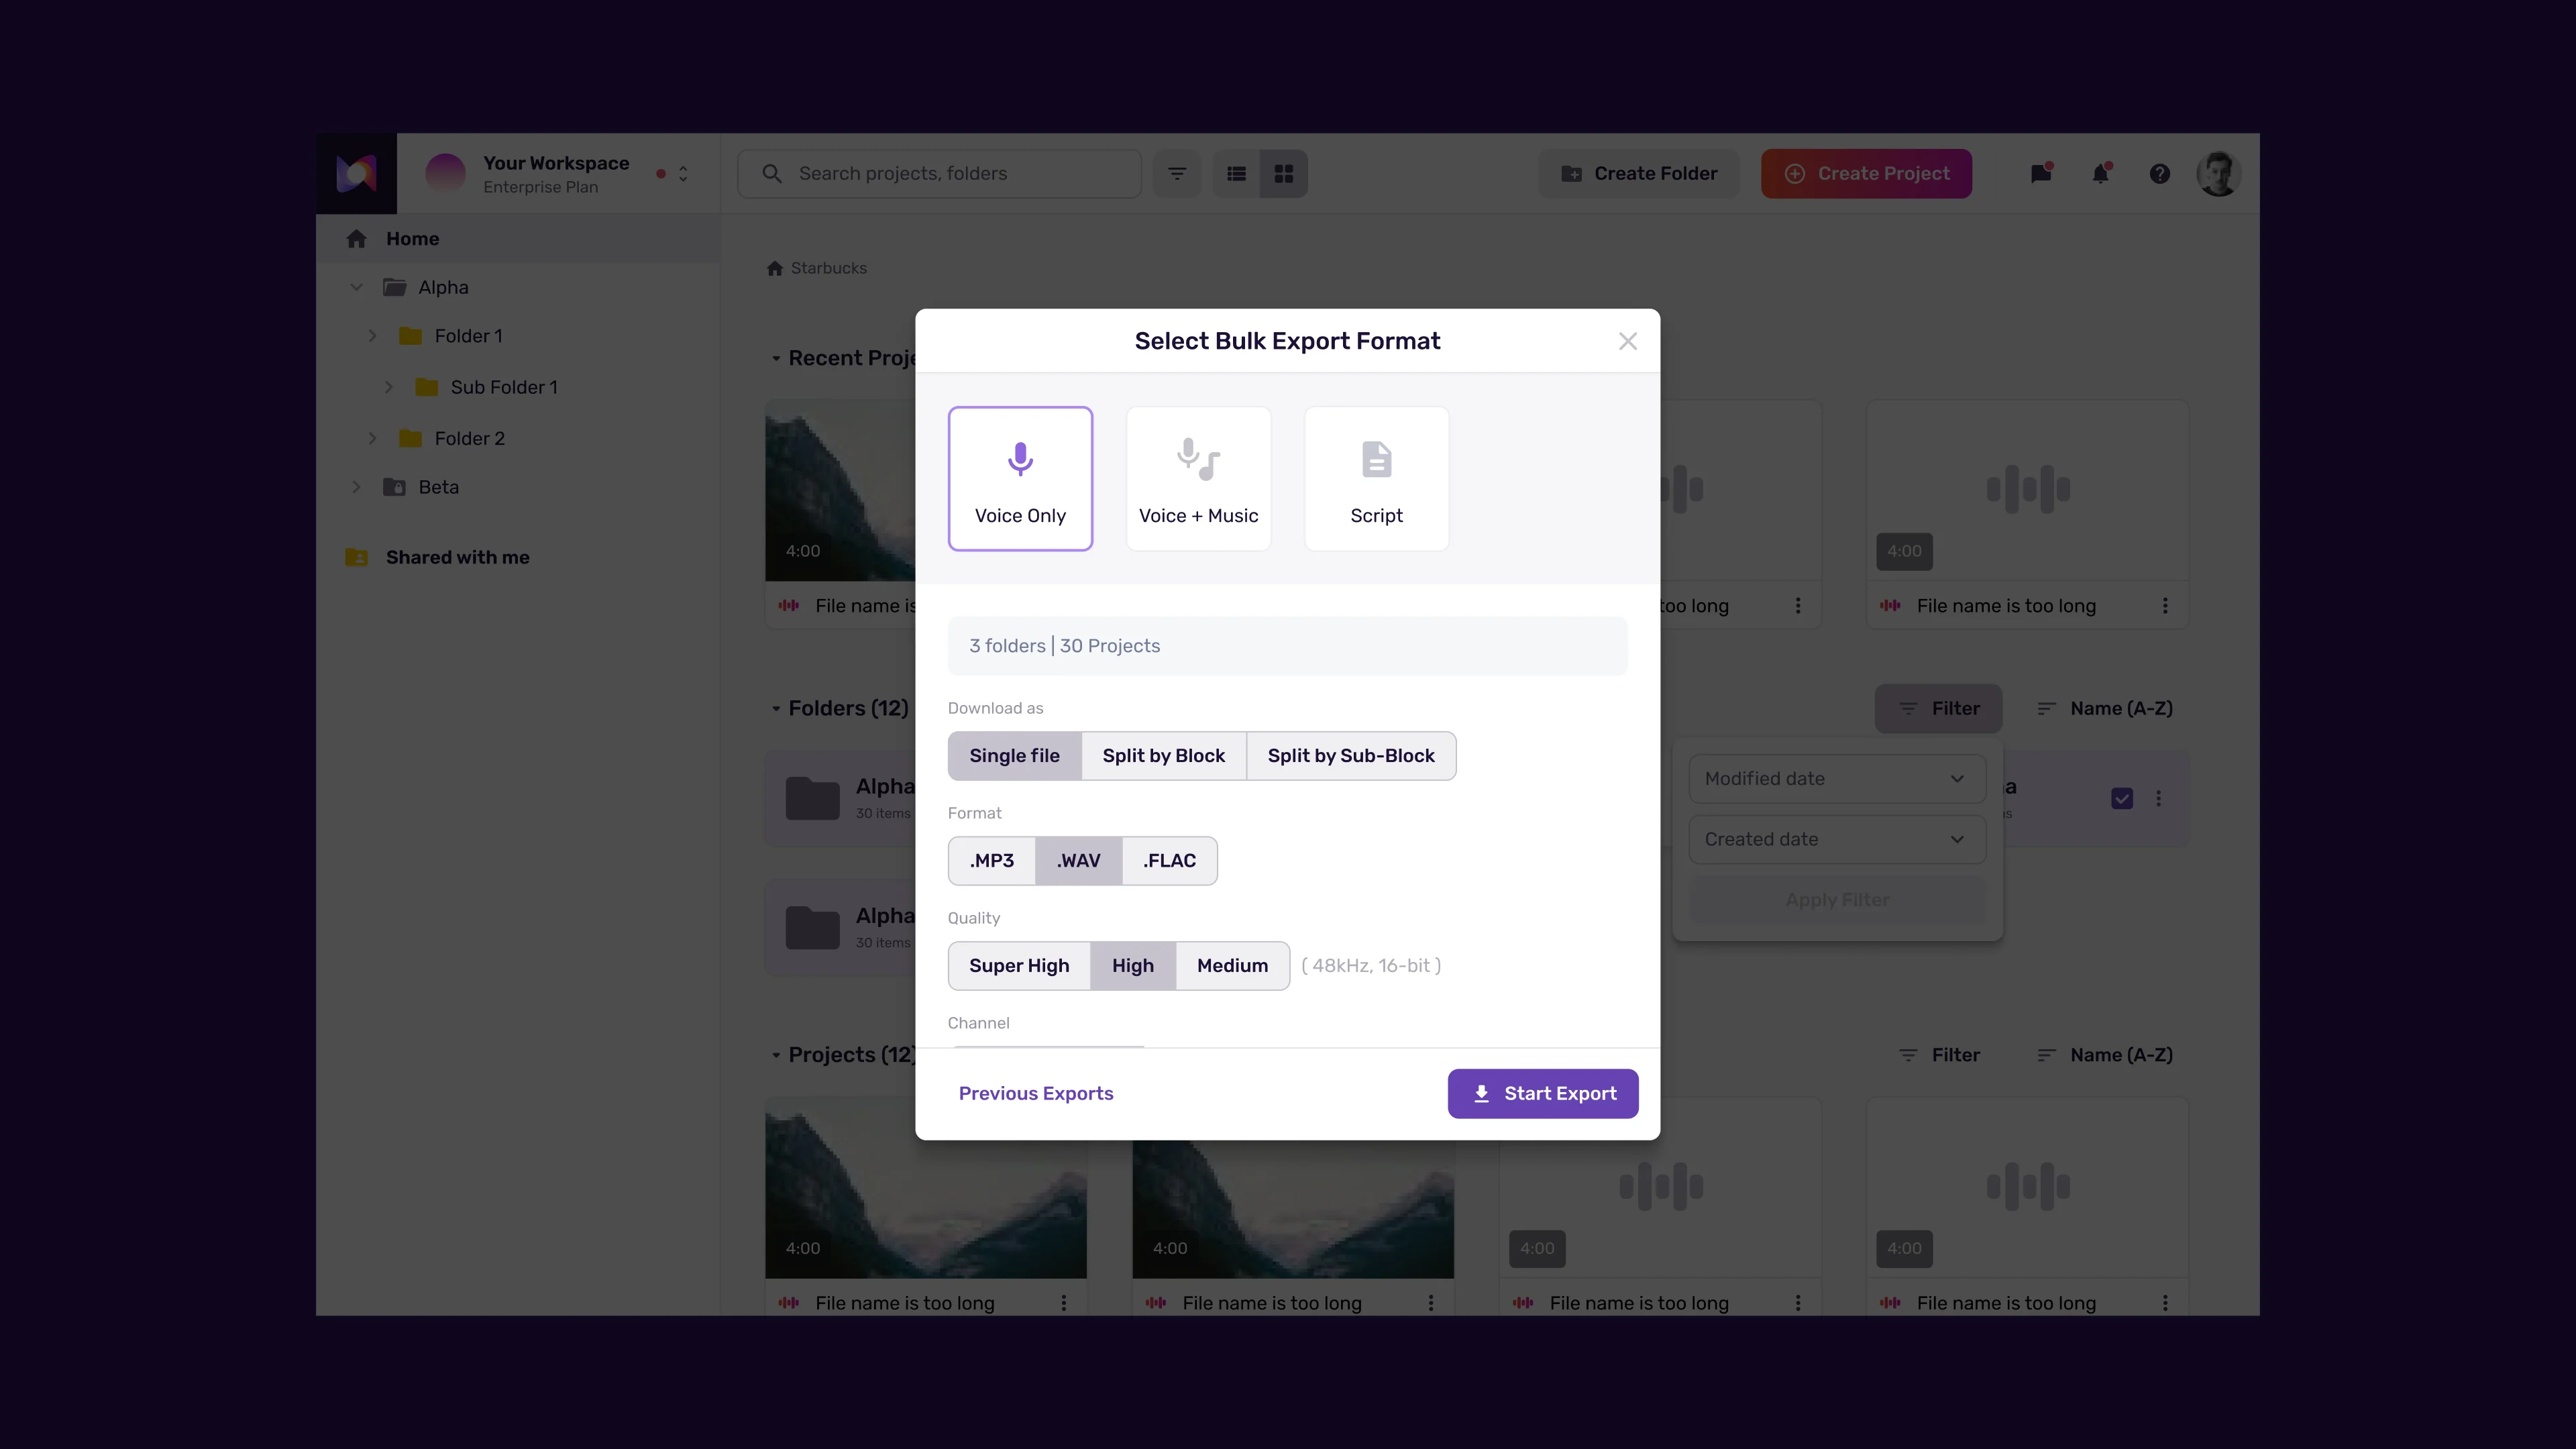
Export settings for YouTube production:
- Click the Export button in the top right of Studio
- Select “Audio Only” as the export type - you will combine the audio with your visuals in your video editor
- Choose WAV format for the highest audio quality and most flexibility in post-production. If file size is a concern or your editor has compatibility issues with WAV, high-bitrate MP3 (320 kbps) is a suitable alternative - the Murf export formats and quality guide compares each option
- Set the sample rate to 48000 Hz - this is the YouTube recommended audio sample rate and matches the default for most professional video formats
- Confirm the export includes all blocks in sequence (check the “Export All Blocks” option rather than exporting individually)
Downloading and organizing:
- After export completes, download the file to your project folder
- Name it clearly: “[VideoTitle]-voiceover-v1.wav” establishes a versioning convention that becomes useful when you generate multiple takes
- Import the downloaded audio file into your video editor on a dedicated voiceover track
Syncing audio with visuals:
- In your video editor, place the voiceover track at the start of the timeline
- Play through the video with the voiceover running to check overall sync
- If specific sections run slightly long or short, trim or extend the corresponding video clips rather than editing the Murf audio - audio editing after export introduces artifacts
- For sections where the voiceover pace does not match the visual length, return to Murf Studio, adjust the speed of the relevant blocks, and export a revised version of those sections only
Pro Tips for YouTube Creators
Match your thumbnail energy. If your thumbnail uses bold typography and high-contrast visuals signaling an energetic video, your Murf AI voiceover should open at 1.2x speed with an expressive voice. Mismatches between thumbnail promise and voiceover delivery cause viewers to click off in the first 10 seconds. The Murf variability and natural-sounding voice tips guide covers how to keep energy high without sounding artificial.
Generate multiple voice options. Before committing to a voice for your channel, generate your intro paragraph in three to five different voices and upload rough cuts of each to a private YouTube video. Watch them back on a phone with earbuds - the way your actual audience will hear it - rather than through desktop speakers. Stretching the free trial as far as it goes? See the Murf free plan tips guide.
Use consistent settings across episodes. Once you find voice settings that work for your channel, document them: voice name, baseline speed, emotion setting, and your standard pause durations. Apply these settings consistently across every video. A consistent voice is part of your channel’s brand identity, and listeners notice when it changes - the Murf team collaboration guide covers shared presets if you have editors helping.
Keep a pronunciation library. Create a text file listing every word, name, or term that required a phonetic correction. Before generating each new video, check your script against this list and pre-load the pronunciations. This saves 5 to 10 minutes of fine-tuning per video as your library grows.
Consider voice-over-video timing at the scripting stage. For tutorial videos where the voiceover describes on-screen actions, write scripts that give viewers one to two seconds of buffer after each instruction before the next one starts. Inserting a 800ms pause after “click the Settings icon” gives viewers time to find and click it before you move to the next step.
Use Murf for B-roll narration only. Some creators find value in recording their own voice for on-camera segments and using Murf only for B-roll narration sequences - product demos, screen recordings, animated explainers. This hybrid approach maintains personal connection for face-cam moments while keeping production quality consistent throughout. For multilingual channels, the Murf MultiNative multilingual guide covers how to keep the same voice character across languages.
Frequently Asked Questions
Can I use Murf AI voiceover on my monetized YouTube channel?
Yes. Murf AI’s Creator and Business plan licenses include commercial use rights, which covers YouTube monetization. The free trial and Basic plan have restrictions on commercial use. If you plan to monetize videos with Murf voiceovers, confirm you are on a plan that includes commercial licensing before publishing. The licensing terms are detailed in Murf’s terms of service and pricing page.
How do I match the voiceover timing to my video cuts?
The most reliable method is to edit your video cuts around the voiceover, not the other way around. Export your Murf audio first, import it into your editor, and use it as your timing anchor. Place B-roll, screen recordings, and transitions to match the voiceover rhythm rather than generating audio to match pre-cut visuals. This produces tighter sync and faster editing sessions. If you have a video with fixed cuts that cannot be moved, use Murf’s speed adjustments at the block level to stretch or compress specific sections to match the visual timing.
What sample rate and bit depth should I use for YouTube?
YouTube recommends 48000 Hz sample rate for all uploaded audio. Export from Murf at 48000 Hz in WAV format for the highest quality. If you are working in a 44100 Hz project in your video editor, set the editor’s project settings to 48000 Hz before importing the Murf audio - mixing sample rates introduces subtle pitch and sync issues on longer videos. For bit depth, 24-bit WAV covers every quality scenario YouTube can deliver; 16-bit WAV is also acceptable and produces smaller files.
How do I handle background music alongside the voiceover?
Export the Murf voiceover as a clean audio file with no music. Add background music as a separate track in your video editor at -18dB to -25dB below the voiceover level - this keeps dialogue intelligible while the music adds energy and texture. Do not apply background music inside Murf Studio. Keeping the vocal and music tracks separate in your editor gives you full control over ducking (automatically lowering music when the narrator speaks), fading, and adjustments during the editing process.
Does Murf AI work well for faceless YouTube channels?
Murf AI is particularly well-suited to faceless YouTube formats - documentary-style explainers, listicle videos, news summaries, educational tutorials, and software walkthroughs. These formats depend entirely on narration quality to hold viewer attention, which is where Murf’s voice consistency and control options provide a genuine production advantage. Many full-time faceless YouTube creators use Murf as their primary voiceover tool for exactly this reason. For a full platform overview, see the Murf AI tool review.
How many minutes of audio does a 10-minute YouTube video require?
A 10-minute YouTube video with wall-to-wall narration requires approximately 1500 to 1800 words of script, generating roughly 8 to 10 minutes of audio. The audio runs slightly shorter than the video to allow for b-roll pauses, transition sequences, and end-screen segments that do not require voiceover. Murf’s free trial includes 10 minutes total - enough to evaluate, but the Creator plan is the genuine entry point for ongoing YouTube production.
Where Murf Falls Short for YouTube Creators
Murf is a strong fit for narrated YouTube content, but it is not the right pick for every creator:
- Live commentary or vlogs - Murf is built for scripted narration. If your channel relies on improvised on-camera commentary, a real microphone still wins
- Voice cloning your own voice for AI-assisted episodes is gated behind the Enterprise plan; ElevenLabs offers cloning on lower tiers if that is the priority
- Free-tier commercial use - the 10-minute free tier excludes commercial rights, so monetised channels need at least the Creator plan
- Sub-50ms streaming TTS for live-stream overlays needs the Enterprise Voice Agent API, not Studio export
For most faceless YouTube channels and tutorial creators - exactly the use case the Creator plan was built for - Murf is the right tool. Just go in clear-eyed about the licensing tier you actually need.
Want to learn more about Murf AI?
Related Reading
- Murf AI Review - Full platform review with pricing, features, and ratings
- Best AI Voice Generators for Content Creators - Compare Murf against competing AI voice tools
- How to Create Voiceovers with AI - General voiceover strategies and platform comparisons
Related Guides
- Getting Started with Murf AI
- Murf Studio Interface Walkthrough
- How to Clone Your Voice with Murf AI
- Murf Text-to-Speech Tutorial
- Choosing the Right AI Voice in Murf
- Murf AI Emotion Controls
- Murf AI Pronunciation and Emphasis
- Mastering Pacing in Murf AI
- Murf MultiNative: Multilingual Voiceovers
- Murf AI Dubbing Walkthrough
External Resources
- YouTube Recommended Audio Specs - Official sample rate and bitrate guidance for upload audio
- YouTube Creator Academy - Free production training including audio mixing best practices
- Murf AI Help Center - Studio documentation, troubleshooting, and tutorials
Related Guides
- AI Voiceover Corporate Training With WellSaid Labs
- AI Voiceover Tips: Making Synthetic Voices Sound Human
- ElevenLabs Getting Started: Complete Beginners Guide
- ElevenLabs Voice Cloning Tutorial: Complete 2026 Guide
- Luma Dream Machine Video Tutorial 2026: Text-to-Video & Ray3
- Murf AI Canva Integration: Add Voiceovers to Designs
- Murf AI Custom Pronunciation: Say It My Way Guide (2026)
- Murf AI Dubbing: Complete Walkthrough | Complete Guide 2026
- Murf AI eLearning Narration: Educator's Guide | Review 2026
- Murf AI Emotion Control: Voice Guide | Review 2026