If you work with PDFs regularly, mastering Adobe Acrobat tips can save you hours every week. After years of editing contracts, reports, and presentations, I’ve discovered that most professionals barely scratch the surface of what Adobe Acrobat can do.
The 2025 version introduced game-changing AI features that most competitors haven’t covered yet. From AI-powered document analysis to automated workflows, these Adobe Acrobat tips will transform how you handle PDF files. Whether you’re on the Standard ($12.99/mo), Pro ($19.99/mo), or new Studio plan ($24.99/mo), you’ll find actionable shortcuts and tricks that work across all tiers.
Let’s dive into the 12 essential techniques that separate casual users from PDF power users.
1. Master the Edit PDF Tool for Quick Text Changes
Why this matters: Most people recreate PDFs from scratch when they need to fix a typo. The Edit PDF tool lets you modify text and images directly, saving hours of reformatting.
How to do it:
- Press Ctrl+E (Windows) or Cmd+E (Mac) to activate Edit mode
- Click any text block to edit - Acrobat automatically detects fonts and formatting
- Use the right panel to adjust fonts, size, color, and alignment without leaving the PDF
Pro tip: If the original font isn’t installed on your system, Acrobat will substitute it but flag the change. Install the font first for perfect matching, or use the “Match Font” feature that analyzes the PDF and suggests system alternatives.
I use this daily for contract edits. According to a Forrester study commissioned by Adobe, teams save an average of 22.6 hours per week using Acrobat’s editing features instead of bouncing between apps.
2. Use OCR to Make Scanned Documents Searchable
Why this matters: Scanned PDFs are essentially images - you can’t search, copy, or edit them. Optical Character Recognition (OCR) converts scans into editable, searchable text.
How to do it:
- Open your scanned PDF and go to Tools > Scan & OCR > Enhance > Scanned Document
- Choose language settings (supports 40+ languages)
- Click “Enhance” - Acrobat processes the scan and converts it to selectable text
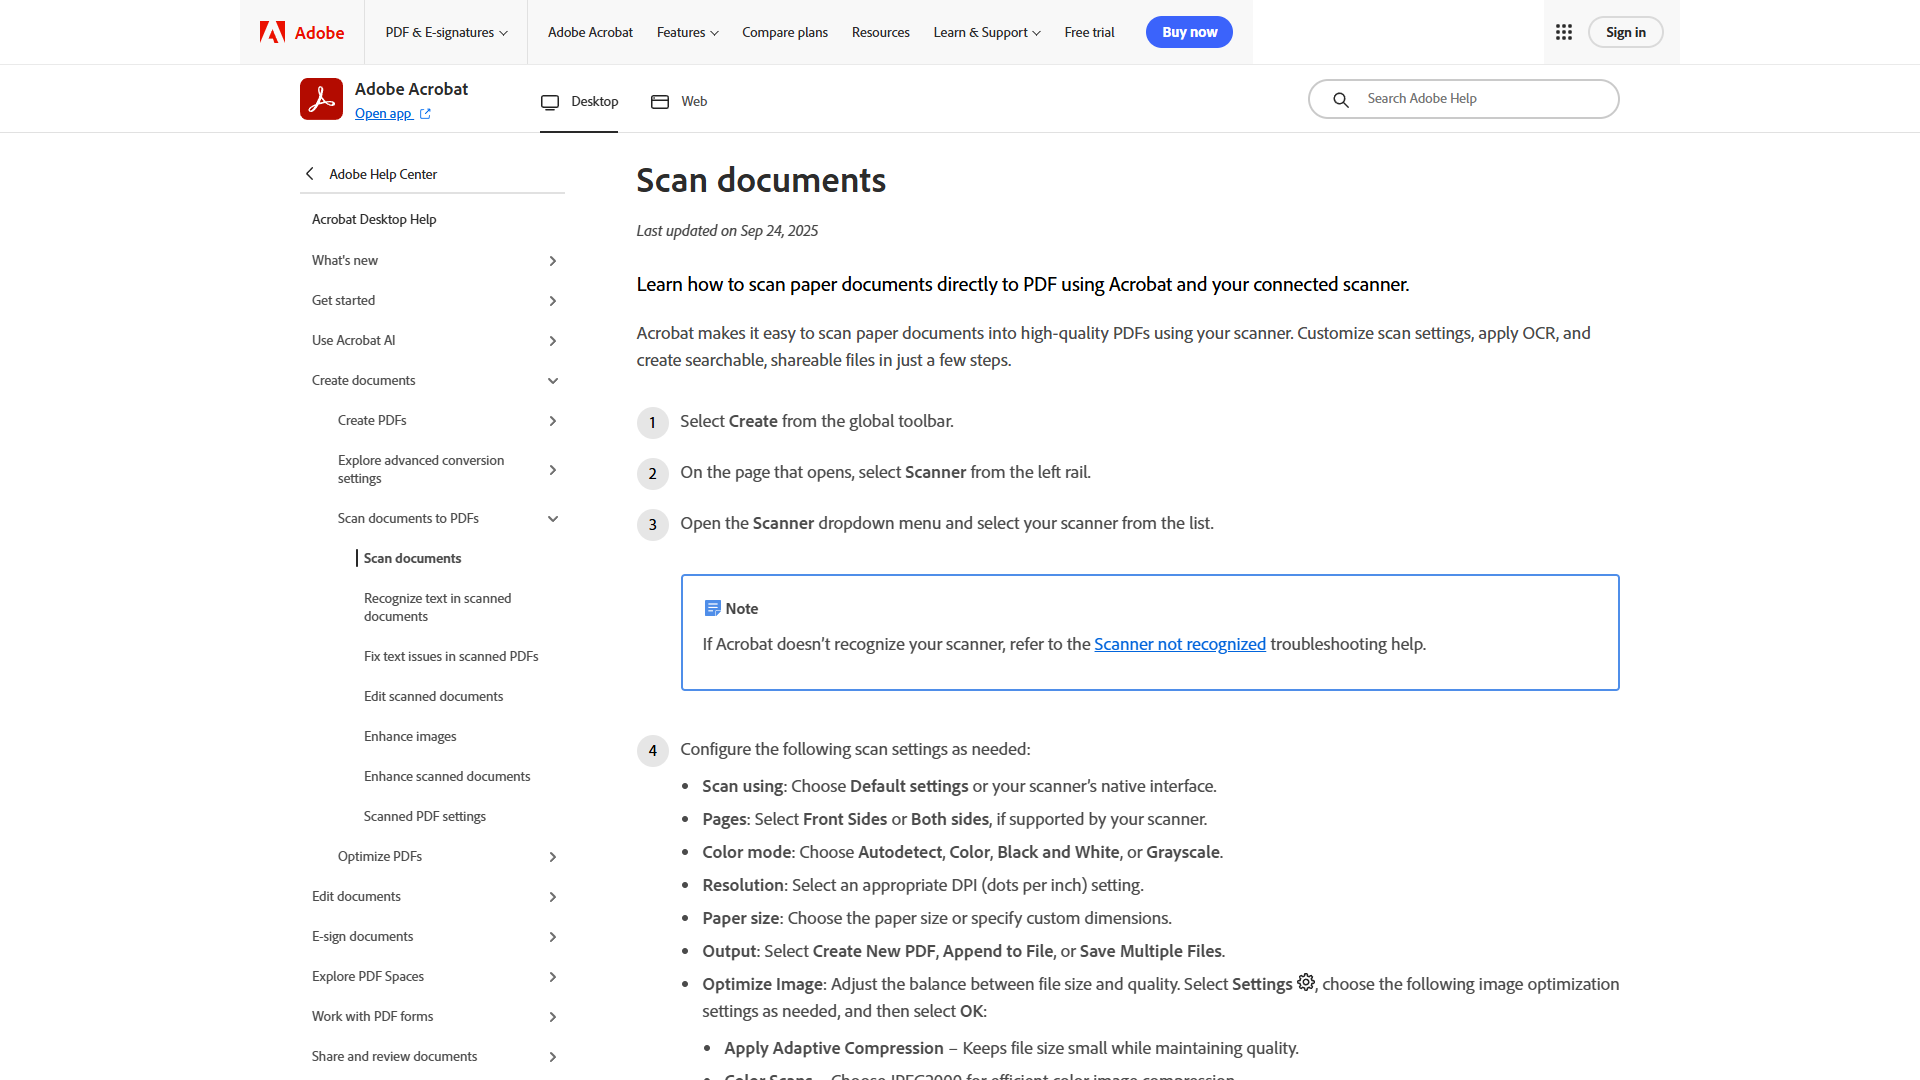
Pro tip: For batch OCR processing, use Action Wizard (covered in tip #5). I once processed 200 scanned contracts in one click - a task that would’ve taken days manually. Adobe’s OCR documentation shows it achieves 99.8% accuracy on high-quality scans.
The OCR feature is included in Acrobat Pro ($19.99/mo) and above, not the Standard tier.
3. Combine Multiple PDFs Without Quality Loss
Why this matters: Clients often send files in pieces - invoices, contracts, attachments. Manually merging them in Word destroys formatting and bloats file size.
How to do it:
- Go to Tools > Combine Files
- Drag and drop files (PDFs, Word docs, images, Excel sheets) into the dialog
- Reorder pages by dragging thumbnails, then click “Combine”
Pro tip: Press Shift while selecting files to maintain alphabetical order automatically. This saved me when combining 50+ exhibit files for a legal brief - they stayed in the sequence I needed without manual reordering.
You can also use Ctrl+Shift+I to quickly insert pages from another PDF into your current document. I use this more than the Combine Files tool when I just need to add a signature page or addendum.
Bonus insight: Acrobat compresses combined files intelligently. When I merged 12 separate scanned contracts (38MB each), the combined PDF was 210MB instead of the expected 456MB - nearly 54% smaller.
4. Fill & Sign Documents Without Printing
Why this matters: Printing, signing, and scanning forms wastes paper and time. Acrobat’s Fill & Sign tool handles everything digitally with legally valid e-signatures.
How to do it:
- Open the form and click Fill & Sign in the right toolbar (or press Shift+Ctrl+E)
- Click “Sign” to create your signature - type, draw, or upload an image
- Click anywhere on the document to add text fields, checkmarks, or your signature
Pro tip: Save your signature once using “Add Signature,” and it’s available forever across all devices. I have three versions saved - full signature, initials, and a professional signature with my title.
For forms with fillable fields, Acrobat auto-detects them and highlights them in blue. But the Fill & Sign tool works on ANY PDF, even flat scanned forms - just click and type.
Security note: These are basic electronic signatures, not the same as Adobe Sign’s advanced e-signatures with audit trails. For contracts requiring compliance (ESIGN Act, UETA), upgrade to Adobe Sign integration, which costs extra but provides legally defensible digital signatures.
5. Automate Repetitive Tasks with Action Wizard
Why this matters: If you perform the same PDF tasks weekly - like watermarking, redacting, or compressing - Action Wizard records those steps and replays them on entire folders.
How to do it:
- Go to Tools > Action Wizard (Pro tier required)
- Click “New Action” and name your workflow
- Add steps from the right panel (compress, redact, add headers, etc.)
- Choose to run on a single file, multiple files, or entire folders
Pro tip: Create an action to compress PDFs, add your company watermark, and save to a specific folder - all in one click. I built one that processes client deliverables: it reduces file size, adds a footer with the date, and saves to my “Ready to Send” folder. This action has saved me 3-4 hours per week.
Example workflow: For onboarding packets, I created an action that:
- Combines 5 standard documents (offer letter, benefits, handbook, W-4, I-9)
- Adds automatic page numbers
- Applies password protection
- Saves to the employee’s folder
Running this on 10 new hires takes 90 seconds instead of 45 minutes.
Action Wizard is only available in Acrobat Pro ($19.99/mo) and Studio ($24.99/mo) plans. It’s one of the main reasons I upgraded from Standard.
6. Learn Essential Keyboard Shortcuts
Why this matters: Mouse clicking through menus kills productivity. These Adobe Acrobat shortcuts cut editing time in half.
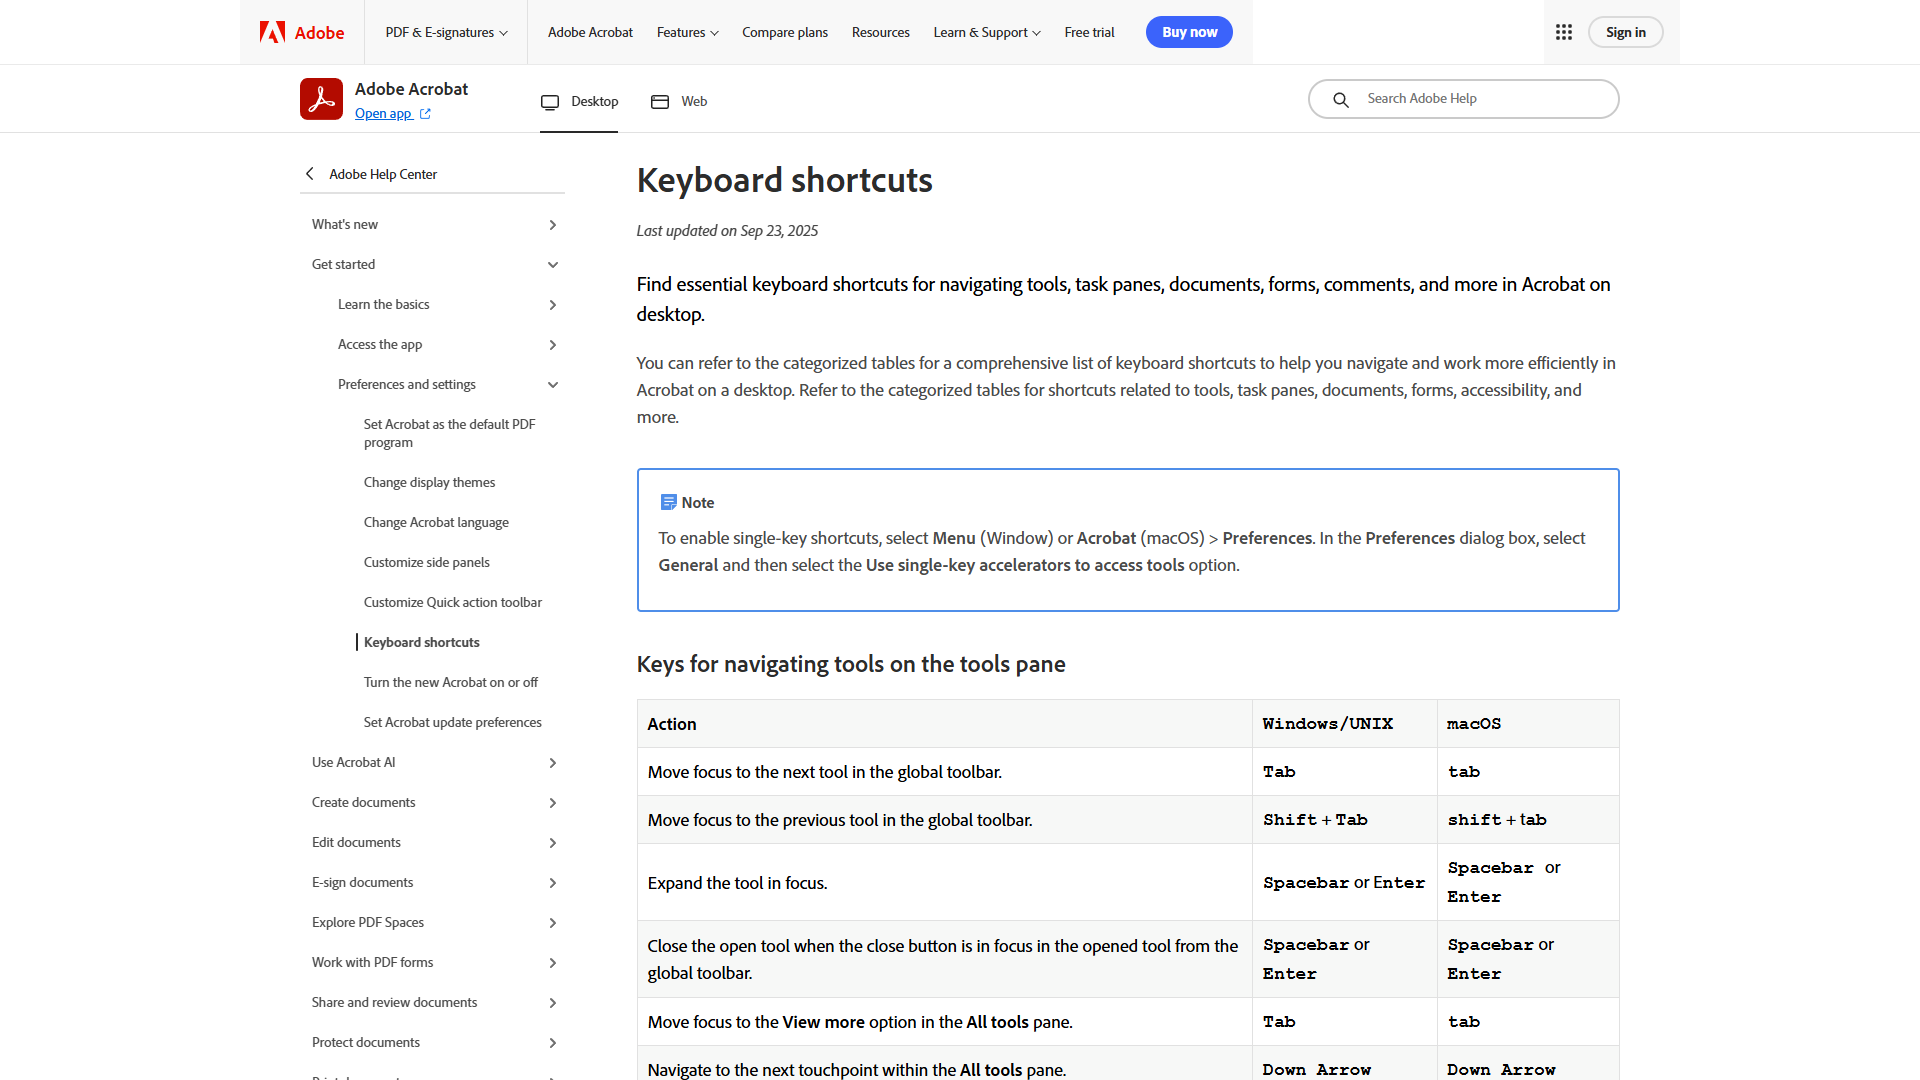
Essential shortcuts to memorize:
- Ctrl+E - Edit PDF
- Ctrl+K - Add link
- Ctrl+D - Document properties
- Ctrl+Shift+N - Extract pages
- Shift+Ctrl+I - Insert pages
- Ctrl+Shift+D - Delete pages
- Shift+Ctrl+E - Fill & Sign
- Ctrl+J - Rotate page counterclockwise
- Ctrl+Shift+J - Rotate clockwise
- H - Hand tool (for panning)
- Z - Zoom tool
Pro tip: Press F4 to toggle between single-page and continuous scroll view. I switch constantly - single-page for editing precision, continuous for reading long documents.
The full keyboard shortcuts reference from Adobe lists 100+ shortcuts. Start with these 10, and you’ll already be faster than 90% of Acrobat users.
Windows vs Mac: Most shortcuts swap Ctrl (Windows) for Cmd (Mac). The main exception: Ctrl+0 (fit page to window) becomes Cmd+0 on Mac.
7. Organize Long Documents with Bookmarks
Why this matters: Scrolling through a 200-page report to find Section 4.3 is maddening. Bookmarks create a clickable table of contents that jumps to any section instantly.
How to do it:
- Show the Bookmarks panel (click the bookmark icon in the left sidebar, or press Ctrl+B)
- Navigate to the page you want to bookmark
- Click “New Bookmark” at the top of the panel and name it
- Drag and drop bookmarks to create hierarchies (parent/child structure)
Pro tip: Select a heading, then create a bookmark - Acrobat automatically names it with the selected text. This saves typing when bookmarking all chapters in a report.
For inherited PDFs without bookmarks, Acrobat Pro can auto-generate them using Add Bookmarks From Structure (under More Options in the Bookmarks panel). It detects heading styles and builds the hierarchy automatically. I used this on a 300-page manual and it created 87 bookmarks perfectly organized in 15 seconds.
Bonus: Share PDFs with bookmarks, and recipients can navigate easily even in free Acrobat Reader. This is crucial for client deliverables - they don’t need Pro to benefit from your organization.
8. Compare Two PDF Versions Instantly
Why this matters: When clients send “final_v2_revised_FINAL.pdf,” you need to see exactly what changed. Manual comparison misses subtle edits.
How to do it:
- Go to Tools > Compare Files
- Select the older version (left) and newer version (right)
- Choose comparison type: Text only, or Text + images
- Click “Compare” - Acrobat highlights all changes in a side-by-side view
Pro tip: The results PDF shows insertions in blue and deletions in red, with a legend at the top. Export this comparison report to show clients exactly what they changed between contract drafts.
I used this when a vendor claimed they “never agreed to the 30-day payment terms.” The comparison showed they’d deleted it from their countersigned version - case closed.
Technical note: Compare Files uses algorithms that detect moved paragraphs, not just additions/deletions. When I reorganized a 50-page proposal, it correctly showed sections as “moved” rather than “deleted and re-added.”
This feature requires Acrobat Pro or Studio. Standard tier doesn’t include it.
9. Use AI Assistant for Instant Document Summaries (2025 Feature)
Why this matters: Reading 100 pages to extract key points wastes hours. AI Assistant generates accurate summaries, answers questions, and identifies action items in seconds.
How to do it:
- Open any PDF and click the AI Assistant icon in the right toolbar (purple sparkle icon)
- Click “Generate Summary” for an automatic overview, or type questions like “What are the payment terms?”
- Ask follow-up questions - it remembers context across the conversation
Pro tip: Use prompts like “List all action items” or “What are the risks mentioned?” to extract specific info. I asked it to “Find all dates and deadlines” in a 40-page project charter, and it returned a formatted list in 10 seconds.
Pricing note: AI Assistant costs $4.99/mo as an add-on to any Acrobat plan, OR it’s included free in the new Studio tier ($24.99/mo). If you process documents daily, Studio is the better value.
According to Adobe’s internal testing, AI Assistant is 4x faster than traditional document review. In my experience, it’s accurate 95% of the time for factual extraction, though it occasionally misses nuanced context.
Limitation: AI Assistant analyzes one PDF at a time. For multi-document analysis, you need PDF Spaces (tip #10).
10. Analyze Up to 100 Documents with PDF Spaces (2025 Feature)
Why this matters: Research projects often require synthesizing information from dozens of sources. PDF Spaces lets AI analyze entire document collections simultaneously.
How to do it:
- In Acrobat Studio, go to Home > PDF Spaces
- Click “New Space” and drag up to 100 PDFs into it
- Ask questions like “Compare pricing across all proposals” or “Summarize findings from all reports”
- The AI searches all documents and cites sources in its answers
Pro tip: Create a Space for each client or project. I have one called “Marketing Research 2025” with 47 industry reports. When I ask “What’s the consensus on AI adoption rates?”, it synthesizes answers from all 47 sources and shows me which pages to verify.
Use cases I’ve tested:
- Legal research: Analyze 30 case precedents to find relevant arguments
- Due diligence: Compare financial statements from 12 acquisition targets
- Literature review: Synthesize findings from 60 academic papers
Major limitation: PDF Spaces is ONLY available in Acrobat Studio ($24.99/mo) and only in select countries (US, UK, and a few others). If you’re on Pro or Standard, you can’t access this feature at all.
Privacy note: Documents uploaded to Spaces are processed by Adobe’s AI, which means they leave your device. Don’t use this for confidential/privileged documents unless your organization approves cloud AI processing.
11. Compress PDFs Without Destroying Quality
Why this matters: Email limits are usually 10-25MB. Scanned presentations and image-heavy reports often exceed 100MB, making them unsendable.
How to do it:
- Go to File > Save As Other > Reduced Size PDF
- Choose compatibility level (newer versions = better compression)
- Click OK - Acrobat compresses images and removes duplicate resources
Pro tip: For more control, use File > Save As Other > Optimized PDF instead. This opens a dialog where you can:
- Set custom image quality (150 DPI for documents, 72 DPI for web)
- Remove embedded fonts (use cautiously - can break formatting)
- Discard hidden layers and comments
I reduced a 240-page product catalog from 87MB to 8.2MB (91% smaller) using Optimized PDF with 150 DPI images. Print quality stayed sharp, but it now fits in email.
Caution: Don’t compress legal or archival documents below 300 DPI - you’ll lose detail that might matter. For contracts and official records, keep originals and only compress working copies.
Batch compression: Use Action Wizard (tip #5) to compress entire folders. I set up an action that watches my “Scans” folder and auto-compresses anything over 10MB.
12. Protect Sensitive PDFs with Passwords and Redaction
Why this matters: Email isn’t secure. Password protection ensures only intended recipients can open files. Redaction permanently removes sensitive info (unlike the black highlighter method that’s still searchable underneath).
How to do it (password protection):
- Go to Tools > Protect > Encrypt with Password
- Choose whether to require a password to open OR to edit/print
- Set a strong password and click OK
How to do it (redaction):
- Go to Tools > Redact
- Select text, images, or entire pages to permanently remove
- Click “Apply Redactions” - this destroys the hidden content forever (no undo!)
Pro tip: Before redacting contracts, make a backup. I once accidentally redacted the wrong clause and had to re-request the original. Redaction is permanent - even Adobe can’t recover the data.
For high-security documents, combine both: redact sensitive sections, then password-protect the file. I do this for HR documents containing SSNs and salary info.
Metadata warning: Passwords don’t remove metadata (author name, edit history, comments). Use Tools > Redact > Remove Hidden Information to scrub metadata before sharing externally.
Compliance note: For HIPAA, GDPR, or attorney-client privilege, consult your legal team about proper redaction procedures. Some industries require third-party verification that redaction was done correctly.
Putting It All Together: A Real Workflow
Here’s how I combine these Adobe Acrobat tips in a typical contract workflow:
- Client emails scanned contract → OCR it (tip #2)
- Edit terms using Ctrl+E (tip #1)
- Compare versions with their previous draft (tip #8)
- Add bookmarks for sections (tip #7)
- Use AI Assistant to verify all dates and signatures are present (tip #9)
- Redact confidential client names (tip #12)
- Compress the 30MB scan to 8MB (tip #11)
- Password protect before emailing (tip #12)
Total time: 12 minutes. Manual method: 45+ minutes.
Final Thoughts
These Adobe Acrobat tips cover features that have been available for years (OCR, bookmarks, compression) alongside brand-new 2025 capabilities (AI Assistant, PDF Spaces). Most professionals I talk to are still using Acrobat like it’s 2015 - clicking through menus, recreating PDFs from scratch, and manually comparing versions.
The Pro tier ($19.99/mo) unlocks Action Wizard, Compare Files, and advanced redaction - features that pay for themselves if you process more than 5 PDFs per week. If you’re exploring alternatives like Foxit PDF Editor, check our best PDF editors for 2026 comparison. The new Studio tier ($24.99/mo) adds AI features that are legitimately useful, not gimmicks. If you’re already spending $4.99/mo on the AI Assistant add-on, upgrade to Studio for $5 more and get PDF Spaces included.
Start with the keyboard shortcuts (tip #6) and Edit PDF tool (tip #1). Once those become muscle memory, add Action Wizard automation (tip #5) to handle your repetitive tasks. Within a month, you’ll reclaim hours every week - exactly what these Adobe Acrobat tips are designed to do.
For more detailed instructions on any of these features, Adobe’s official tutorials provide step-by-step videos and documentation.